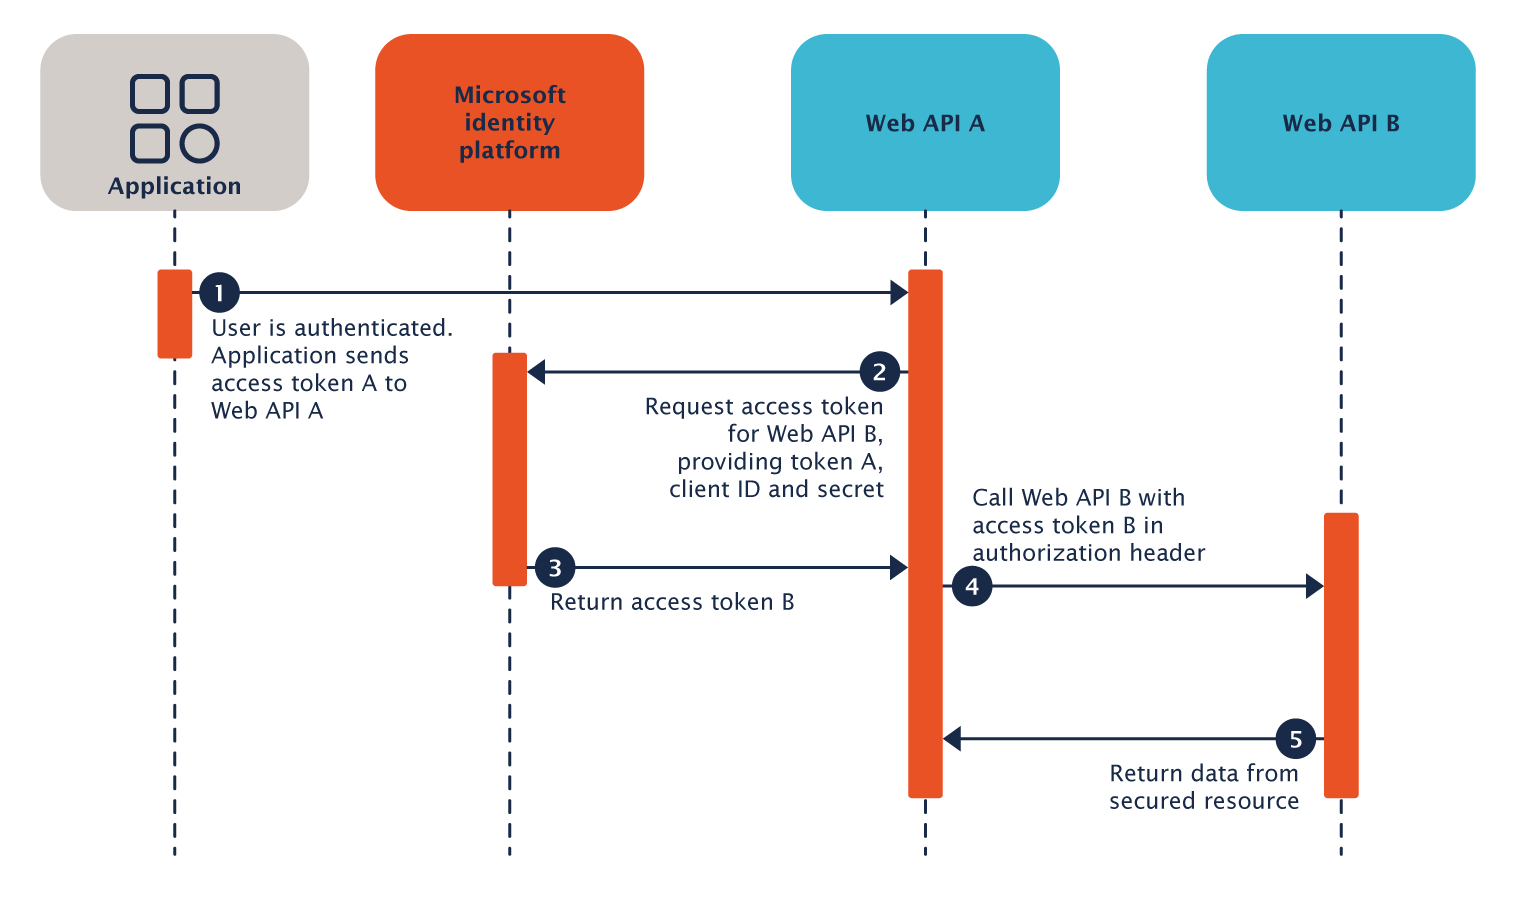
 In a previous blog post, we described an approach to forward the identity in the form of the user’s metaphactory access token. Here, we’ll go a step further and show you how the Microsoft Azure On-Behalf Of workflow (OBO) can be employed—to not only forward the metaphactory token but exchange it with an access token for the target application, therefore providing a maximum level of security.
How to configure Single Sign-On in metaphactory for maximum security & control
metaphactory can be used with OpenID Connect (OIDC) to establish Single Sign-On and enables identity sharing with the underlying database by forwarding the user’s token from the platform. This allows user authentication from the metaphactory (web) front-end, down to the actual data source. In contrast to applying a technical user for authentication at the database level, this setup enables maximum security, control and compliance and allows for defining access control on different levels: the application level and the database level.
In a previous blog post, we described an approach to forward the identity in the form of the user’s metaphactory access token. Such an approach requires that both metaphactory and the database share the same application registration in the identity provider. Ultimately, this means that both metaphactory and the database share the identity with all its associated information (such as, for instance, group membership) making it hard to distinguish the identities within the application. Therefore, this approach bears clear drawbacks from a security, auditing and logging perspective and also results in usability restrictions, such as the fact that the OIDC redirect URLs cannot be defined in a way that works for both systems.
Therefore in this blog post, we’ll go a step further and show you how the Microsoft Azure On-Behalf Of workflow (OBO) can be employed—to not only forward the metaphactory token but exchange it with an access token for the target application, therefore providing a maximum level of security. Both metaphactory and the database are configured with SSO and use distinct application registrations as well as configurations in the identity provider. For any database interaction, metaphactory exchanges the user’s token (valid in the metaphactory application registration) with a user-specific access token for the target database.
Table of contents
-
How to configure SSO in metaphactory following Azure’s On-behalf-of workflow
-
Step 1: Create an app registration for the metaphactory instance
-
Step 4: Register the metaphactory app as a client to GraphDB
-
Step 7: Adjust API permissions in the metaphactory app registration
-
Step 8: Configure applications to explicitly use Azure V2 API
How to configure SSO in metaphactory following Azure’s On-behalf-of workflow
Follow the step-by-step guide below to learn how to configure the on-behalf-of workflow. In our scenario, we use metaphactory as the frontend application, whereas all database interaction should be performed using the identity of the user. We’ll show how the app registrations and their API scopes can be set up in Microsoft Azure, and demonstrate the configuration details for both metaphactory and the database.
Note that in the below example, we demonstrate the steps for Ontotext GraphDB, however, they can be similarly applied to other databases that support OIDC (e.g., Stardog or RDFox).
Step 1: Create an app registration for the metaphactory instance
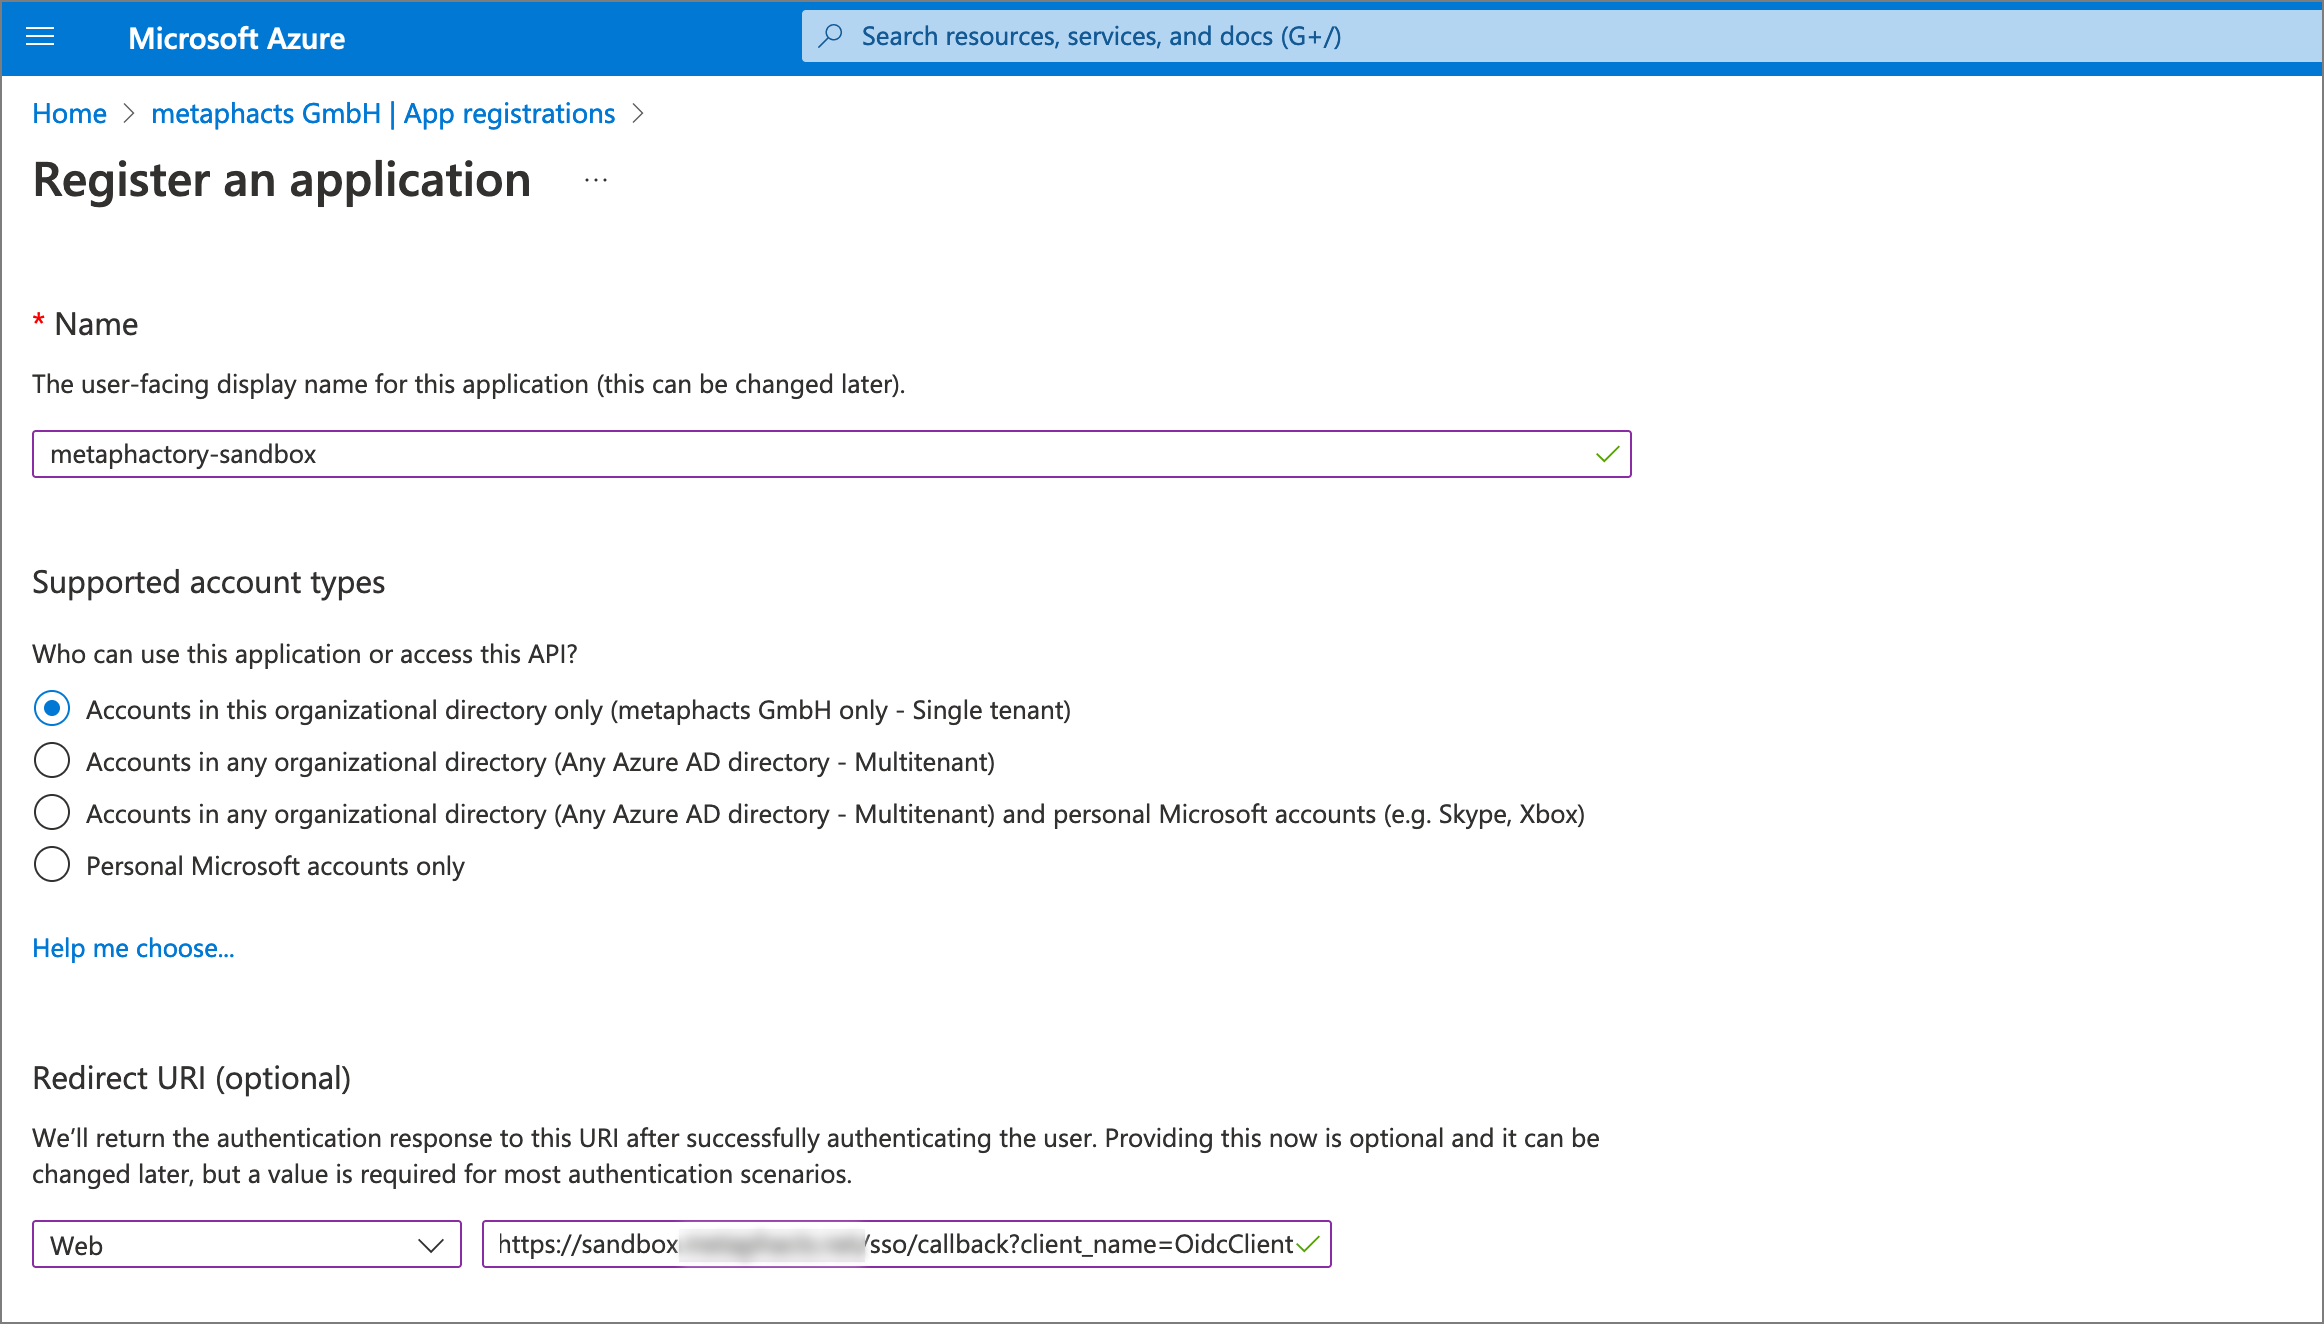
As a first step, the app registration for metaphactory needs to be created in the Microsoft Azure Portal.
Click on “New registration”.

In our example, we create an app registration for an example deployment hosted at https://<external-metaphactory-url>. We populate the form fields as needed, and specifically as a redirect URI use type Web and the scheme
Note that the path sso/callback?client_name=OidcClient is the callback endpoint in metaphactory that handles authentication and authorization using the response from the identity provider.
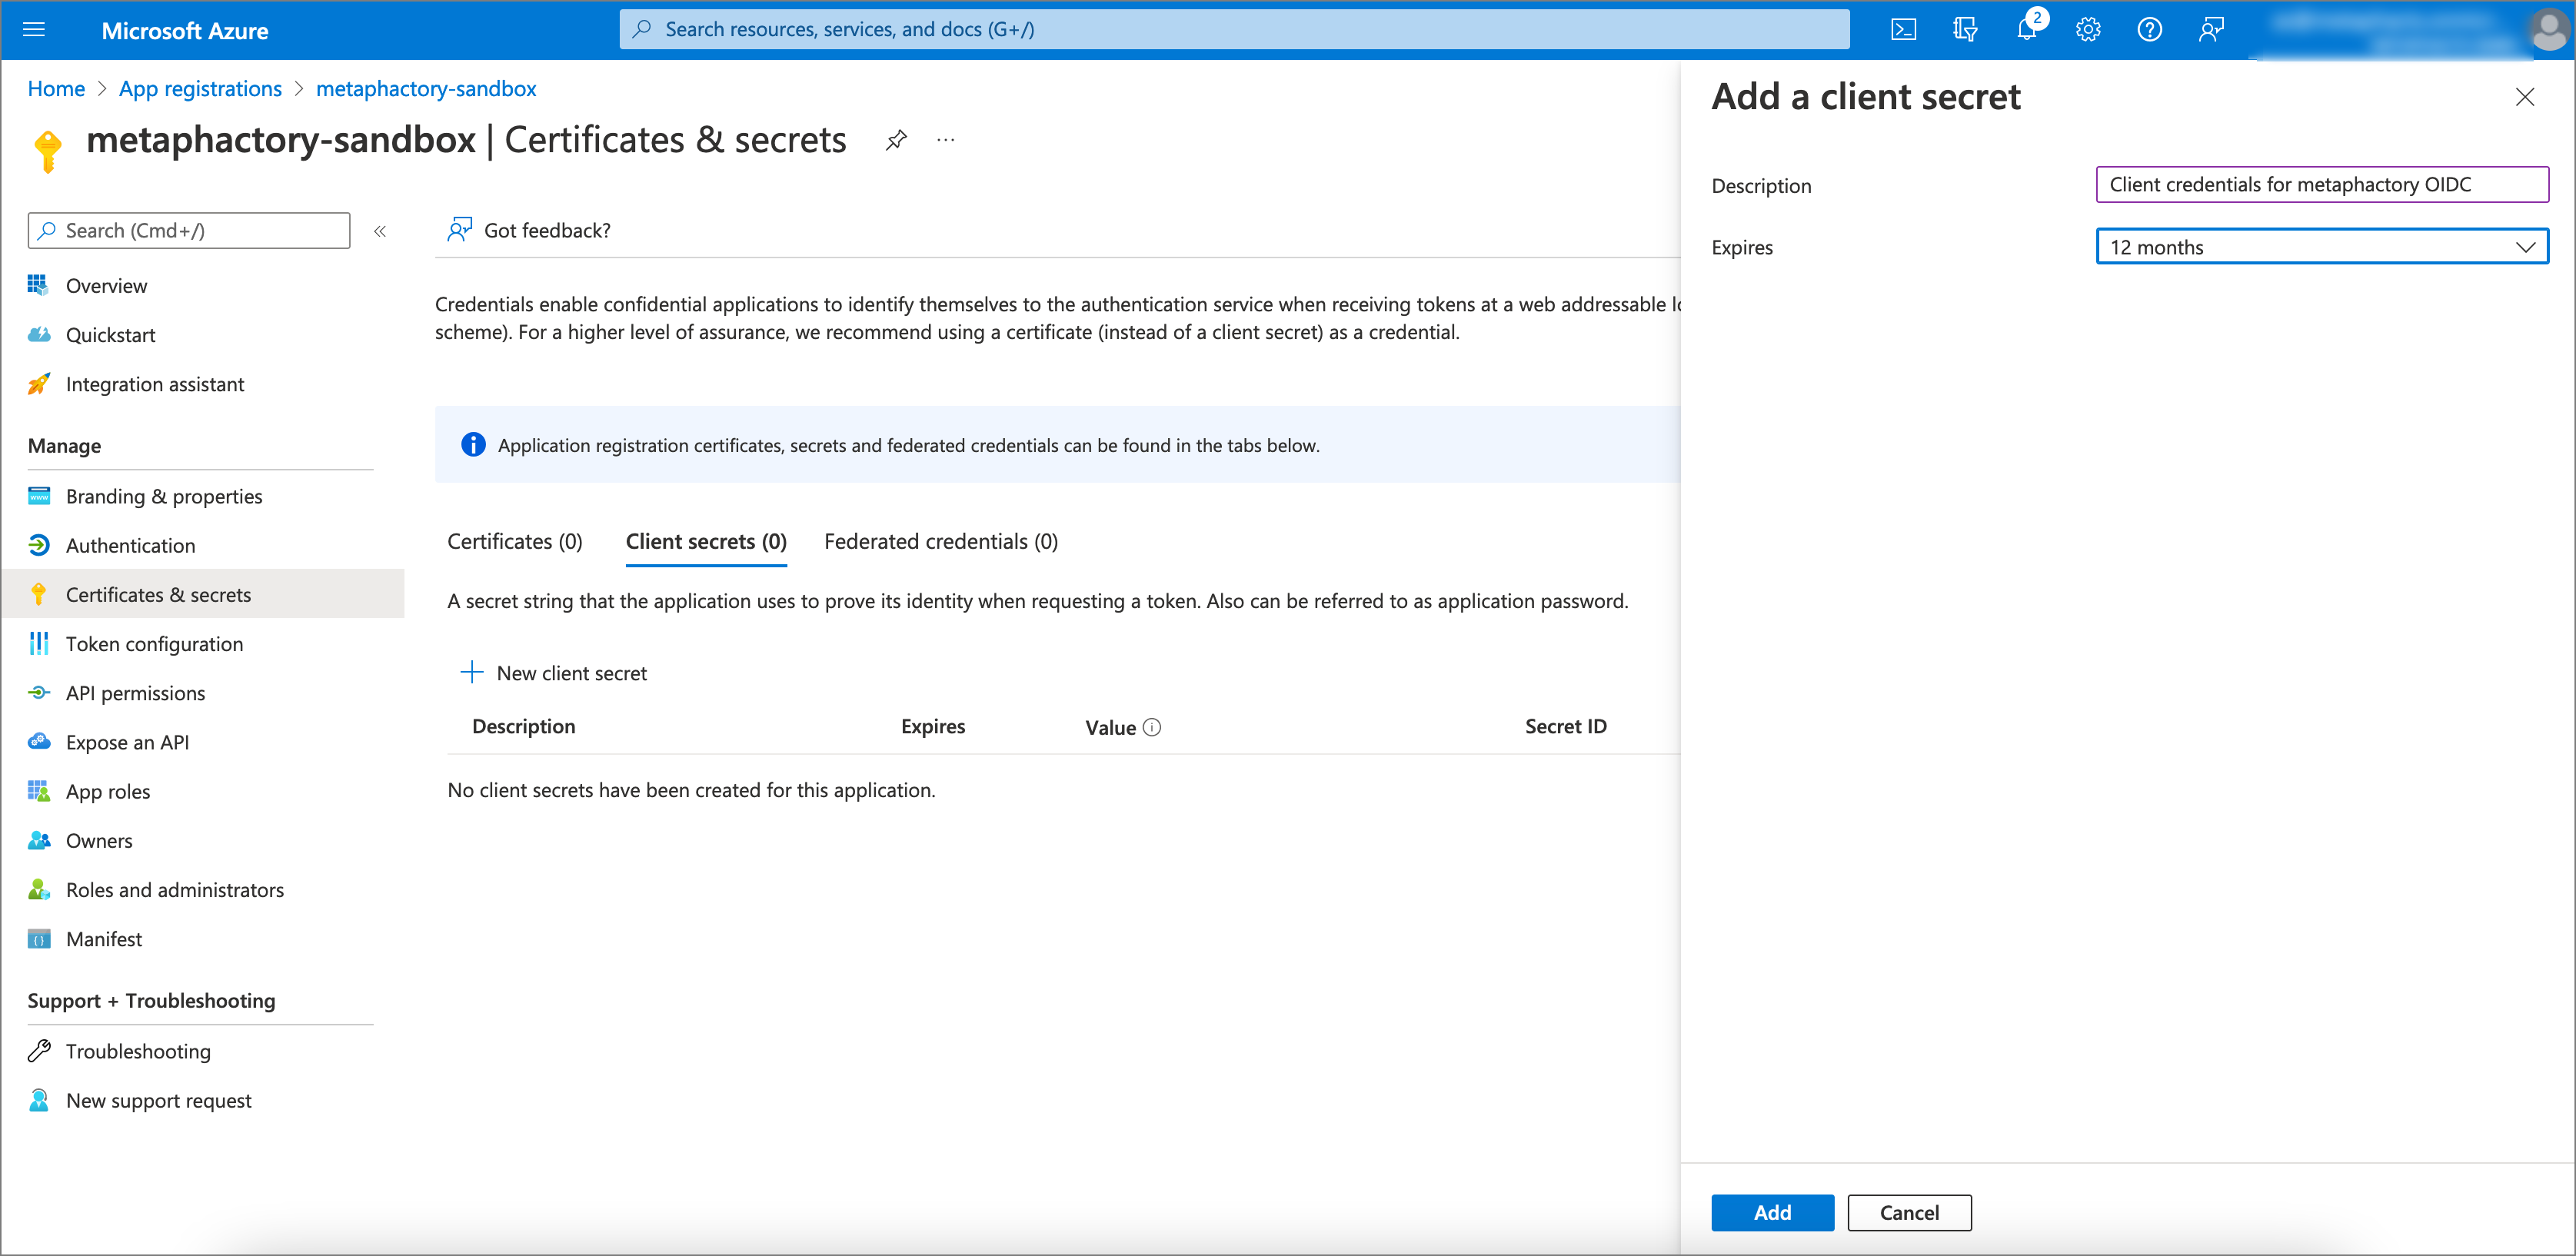
For use in metaphactory as an identity provider, a client secret needs to be configured on the app registration. Take note of this secret as it will be required later below in Step 8 in the metaphactory SSO configuration.
Step 2: Create an app registration for the GraphDB instance
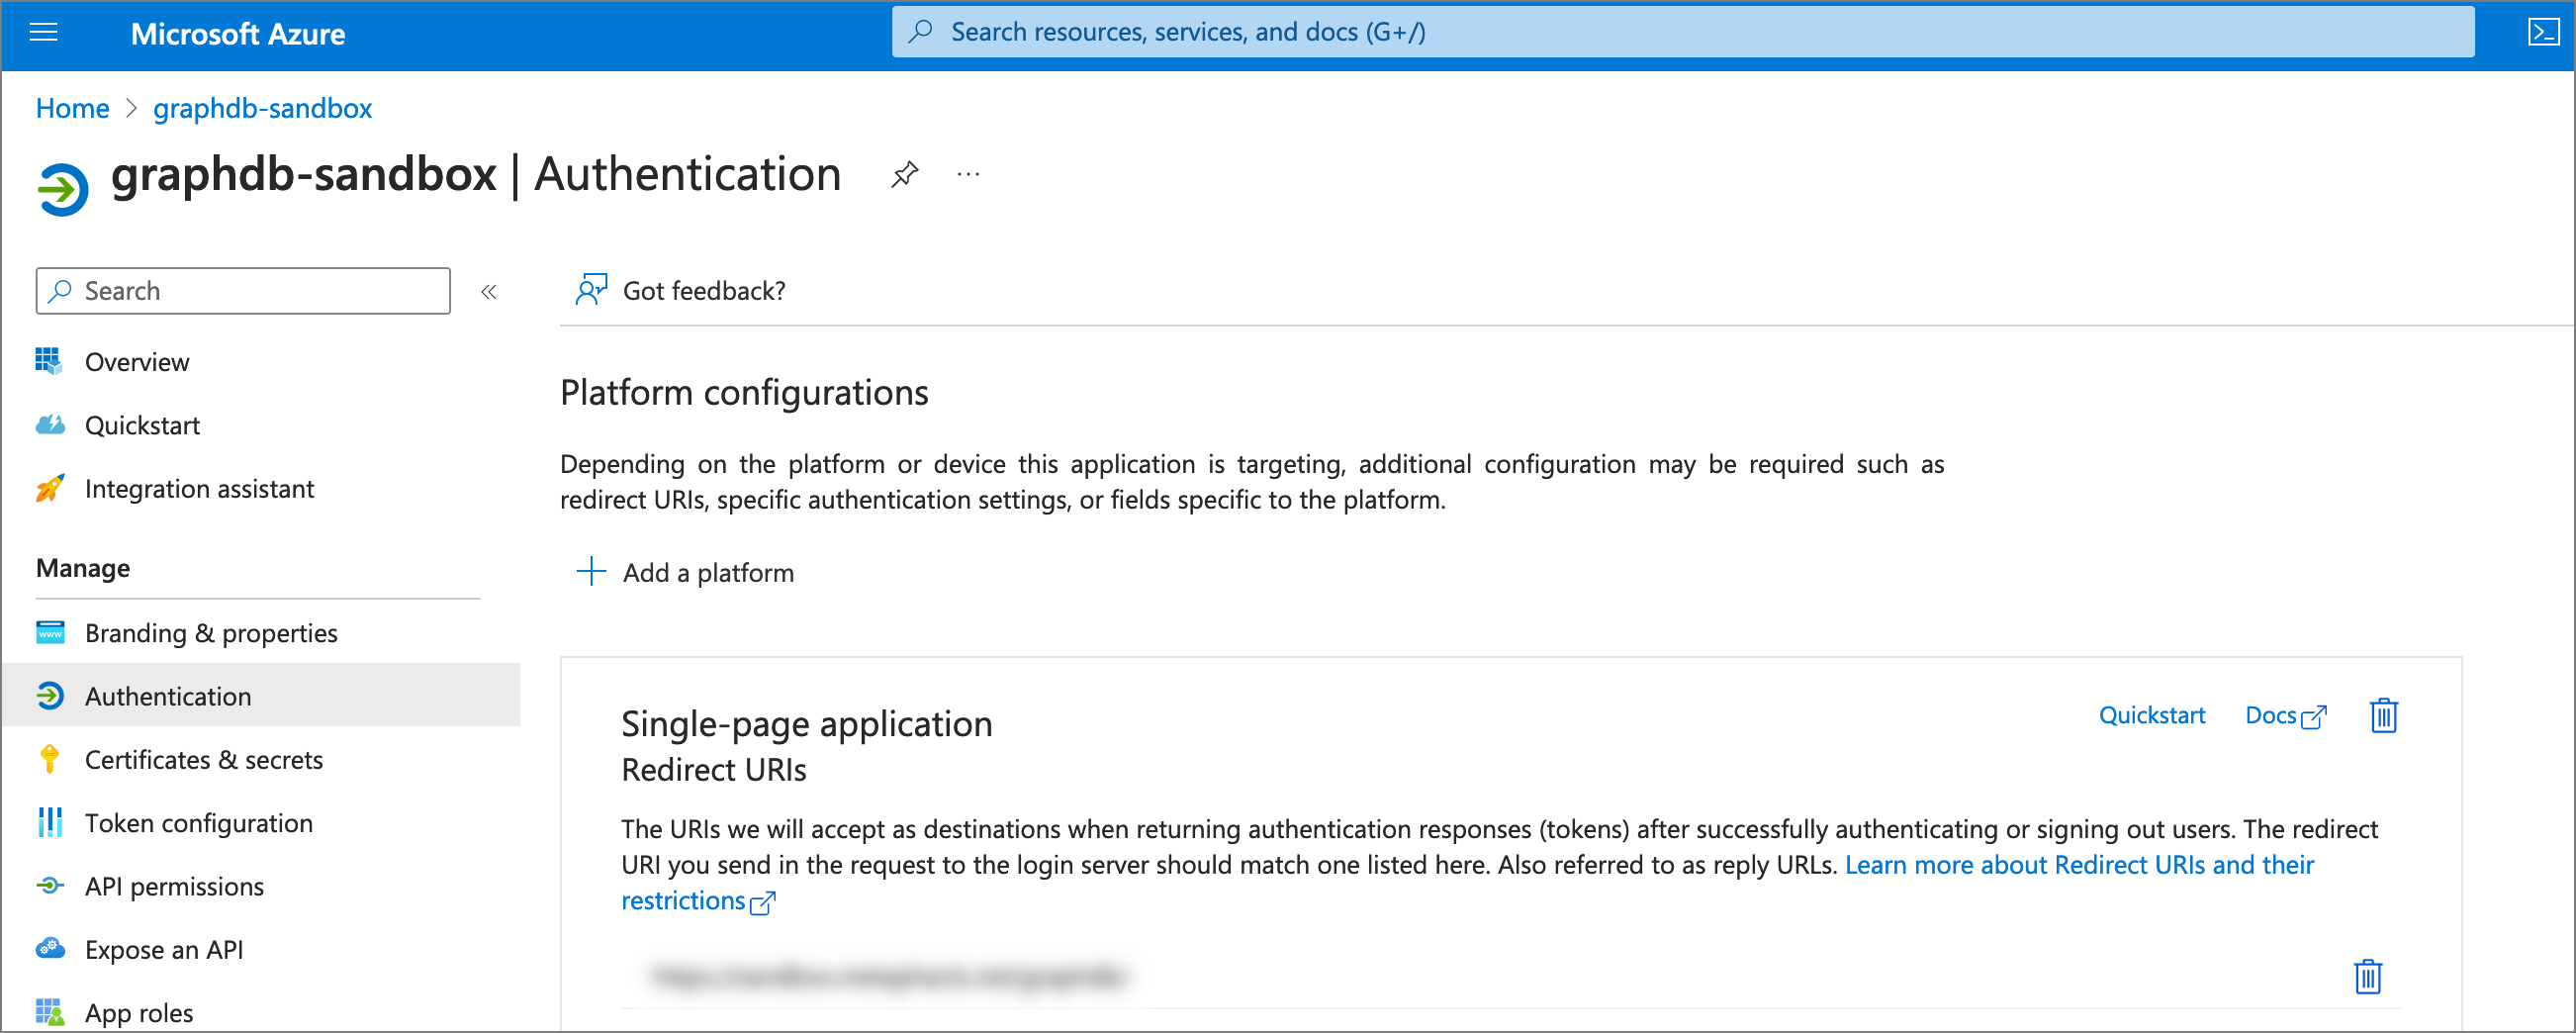
Next, we require an app registration for GraphDB. We name this application graphdb-sandbox. Note that the GraphDB workbench is a single-page application and needs the authentication configuration (specifically the Redirect URI) to be configured as such, i.e. it needs to point to the GraphDB workbench.
Step 3: Expose an API in the GraphDB app registration
For Step 3, we expose an API in the GraphDB app registration to later grant access for metaphactory. In this API we expose a scope called user-access and make it available to “Admins and users”.
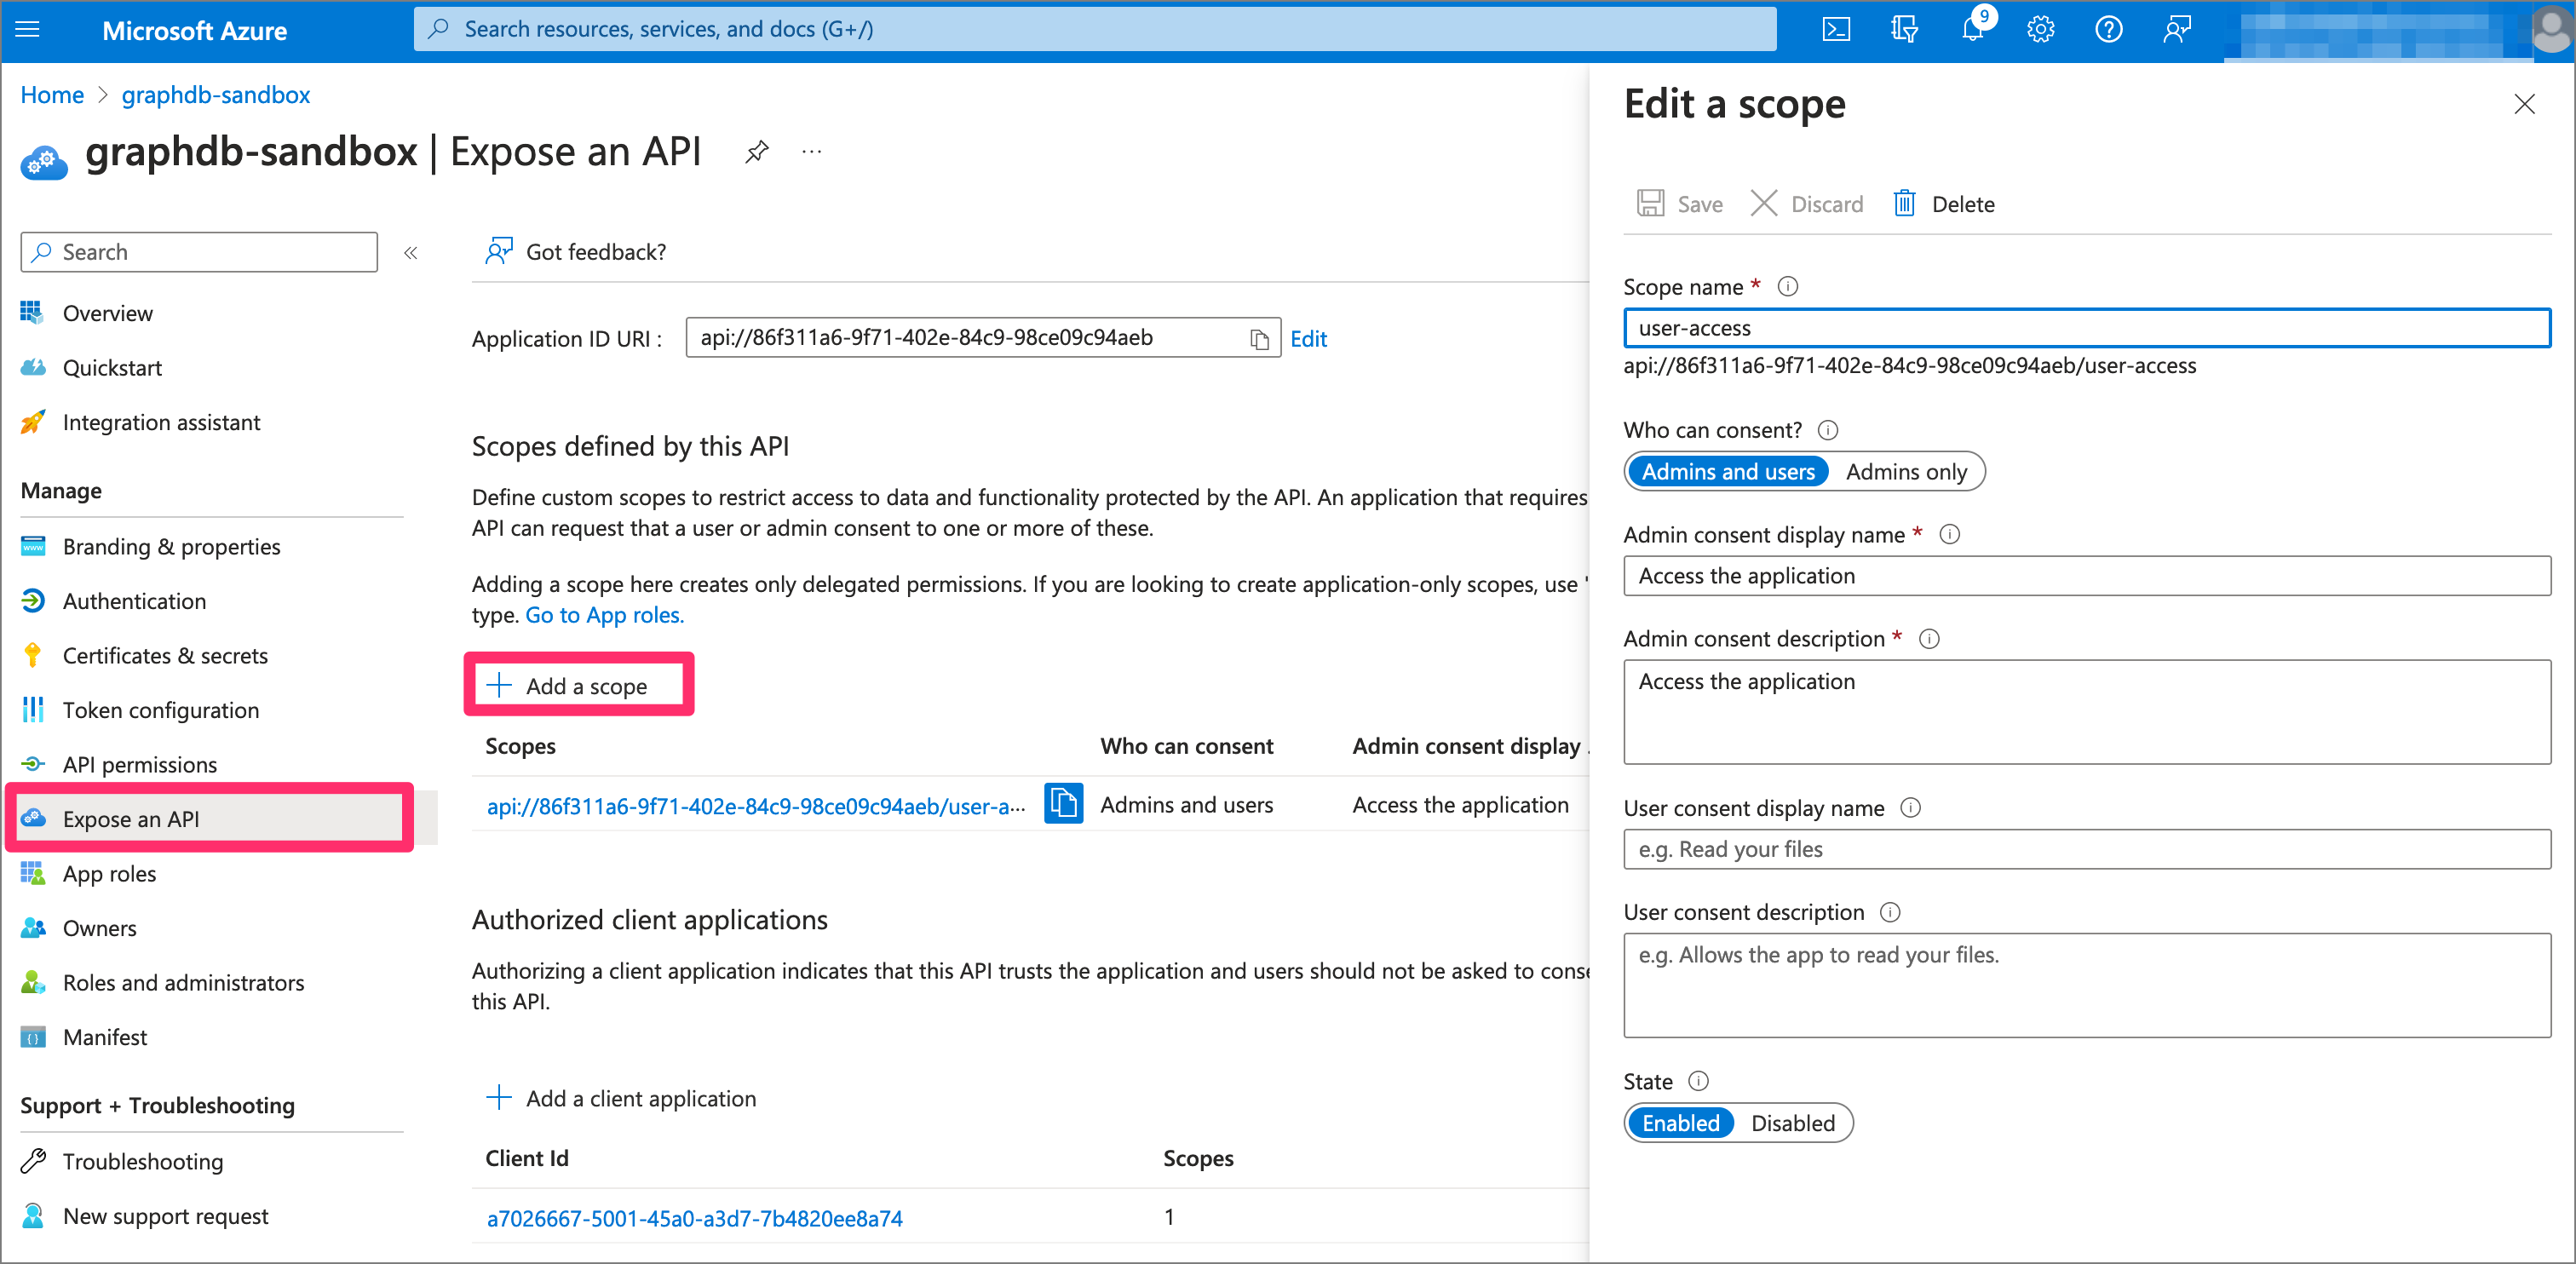
Step 4: Register the metaphactory app as a client to GraphDB
Now we register the metaphactory application registration (created in Step 1) as a client to the GraphDB application registration. We require the client ID of the metaphactory app, and moreover, in the UI check the just created user-access API in Authorized scopes.
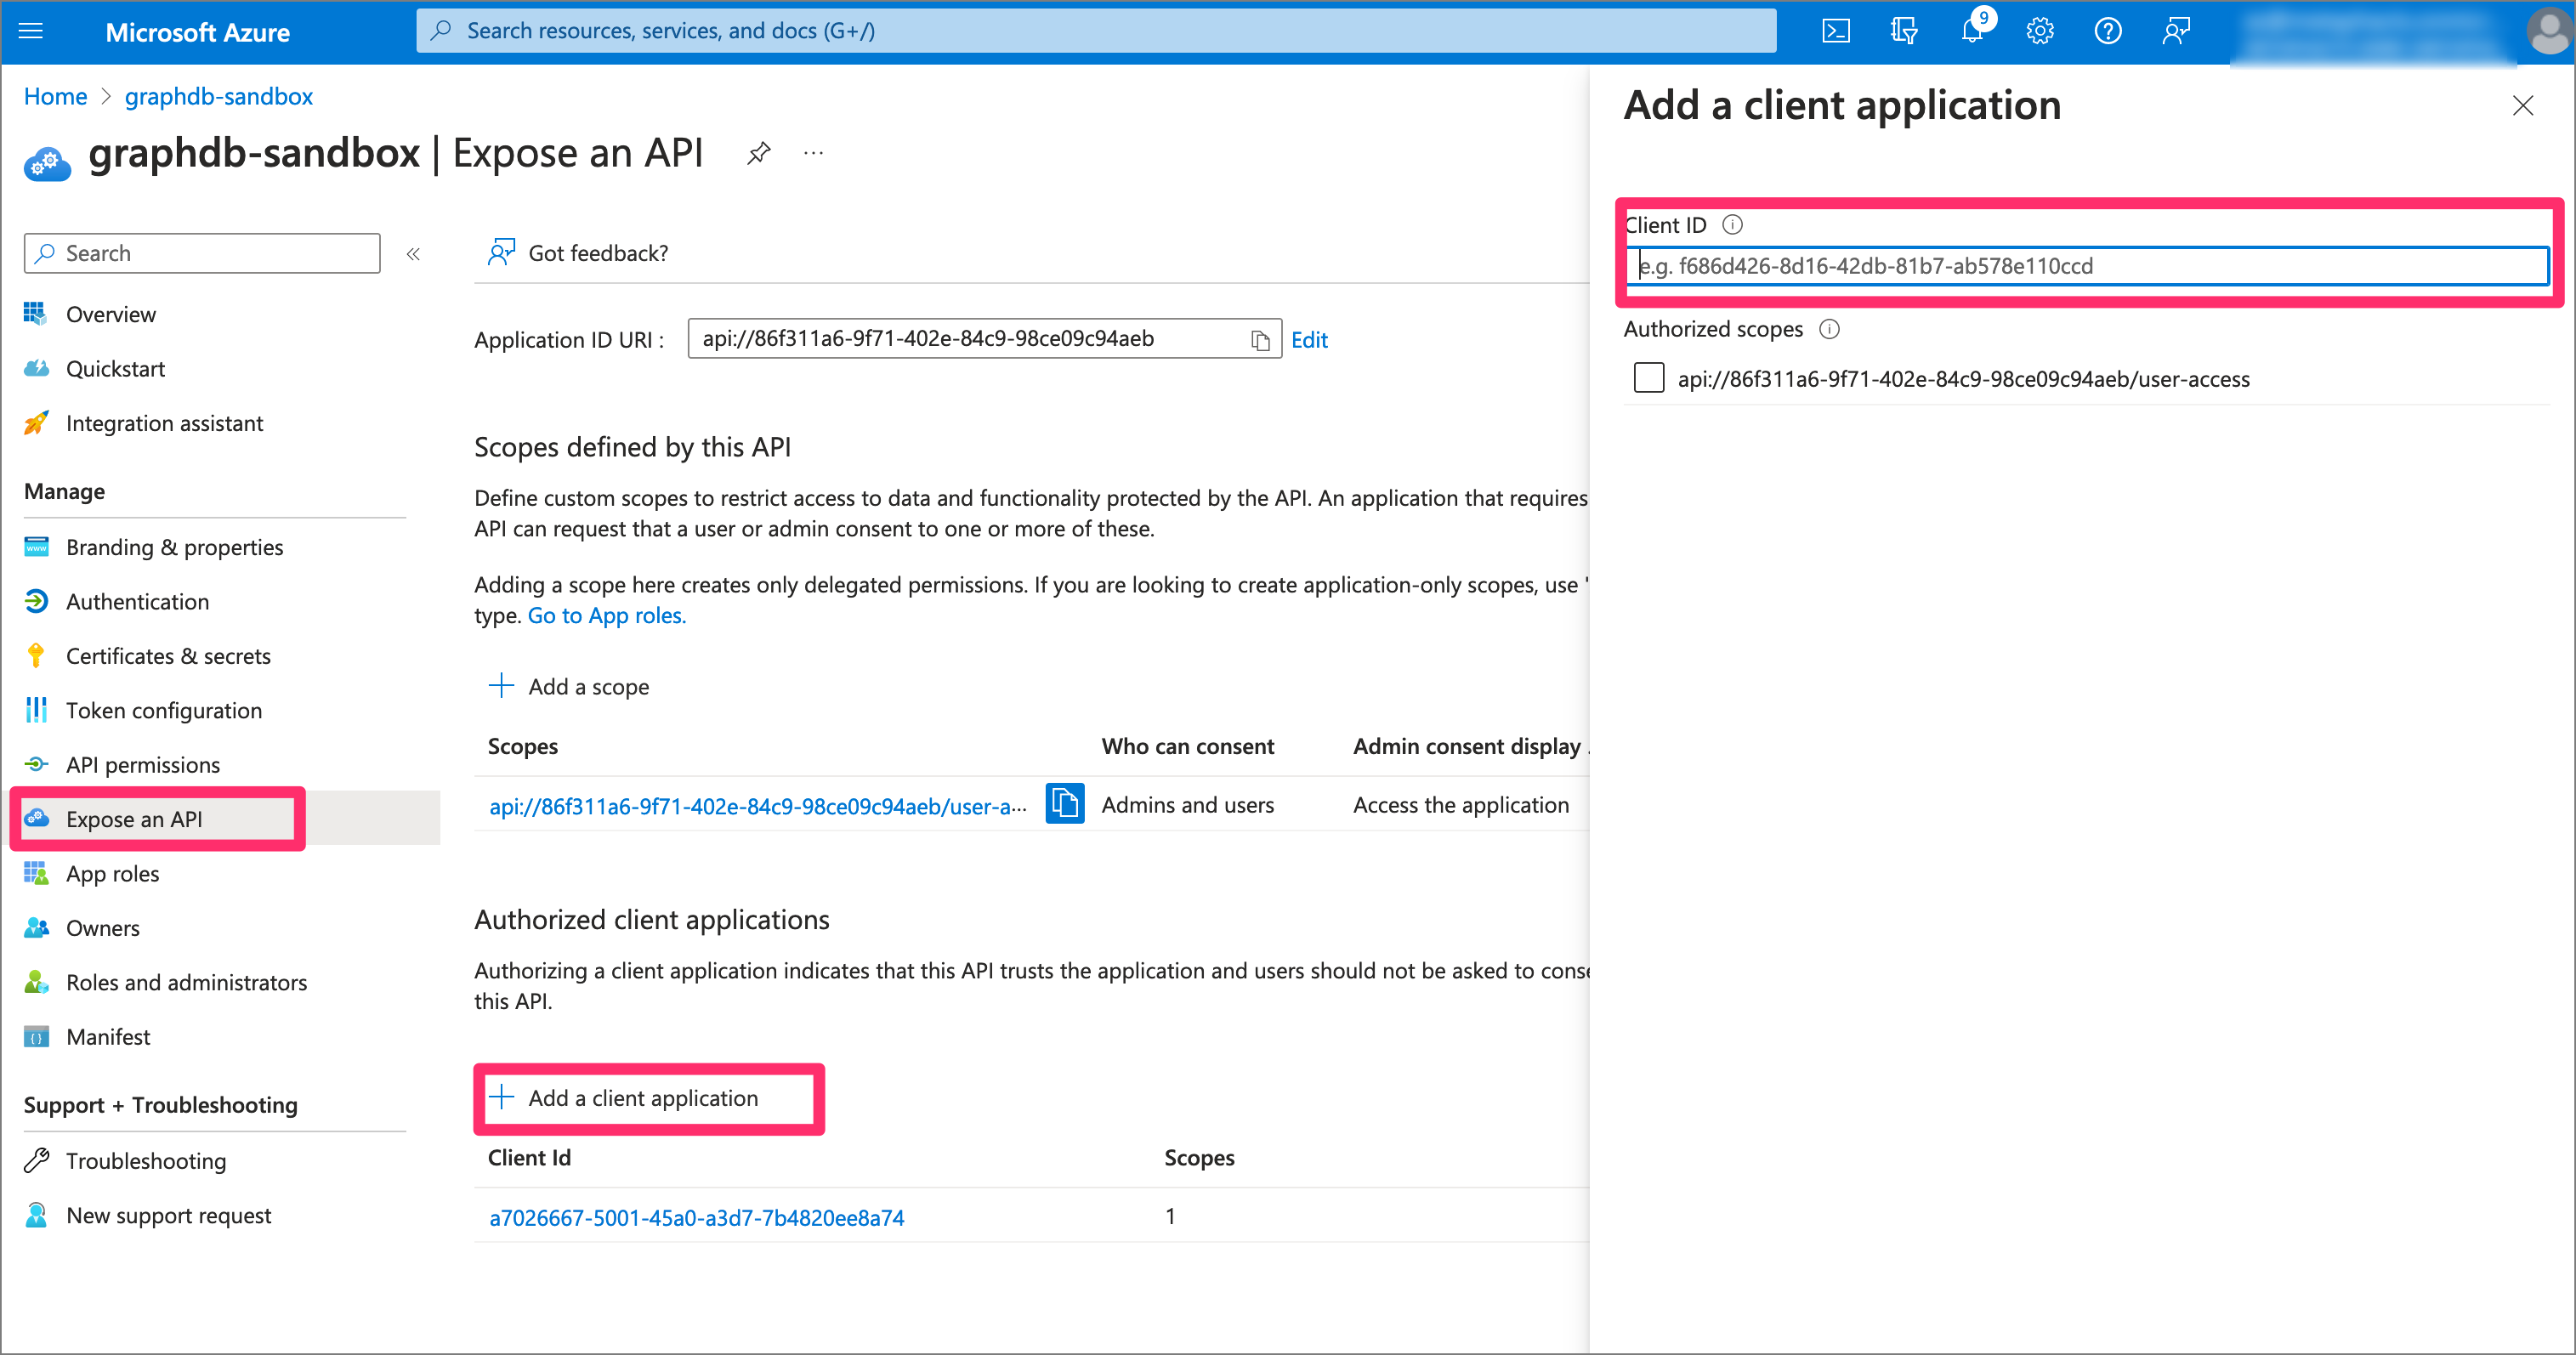
Step 5: Add a permission for the newly added GraphDB API
Next, we add a permission to the newly created GraphDB API. We choose “Delegated permissions” and select the permissions for the scope (i.e., in our case “user-access”).
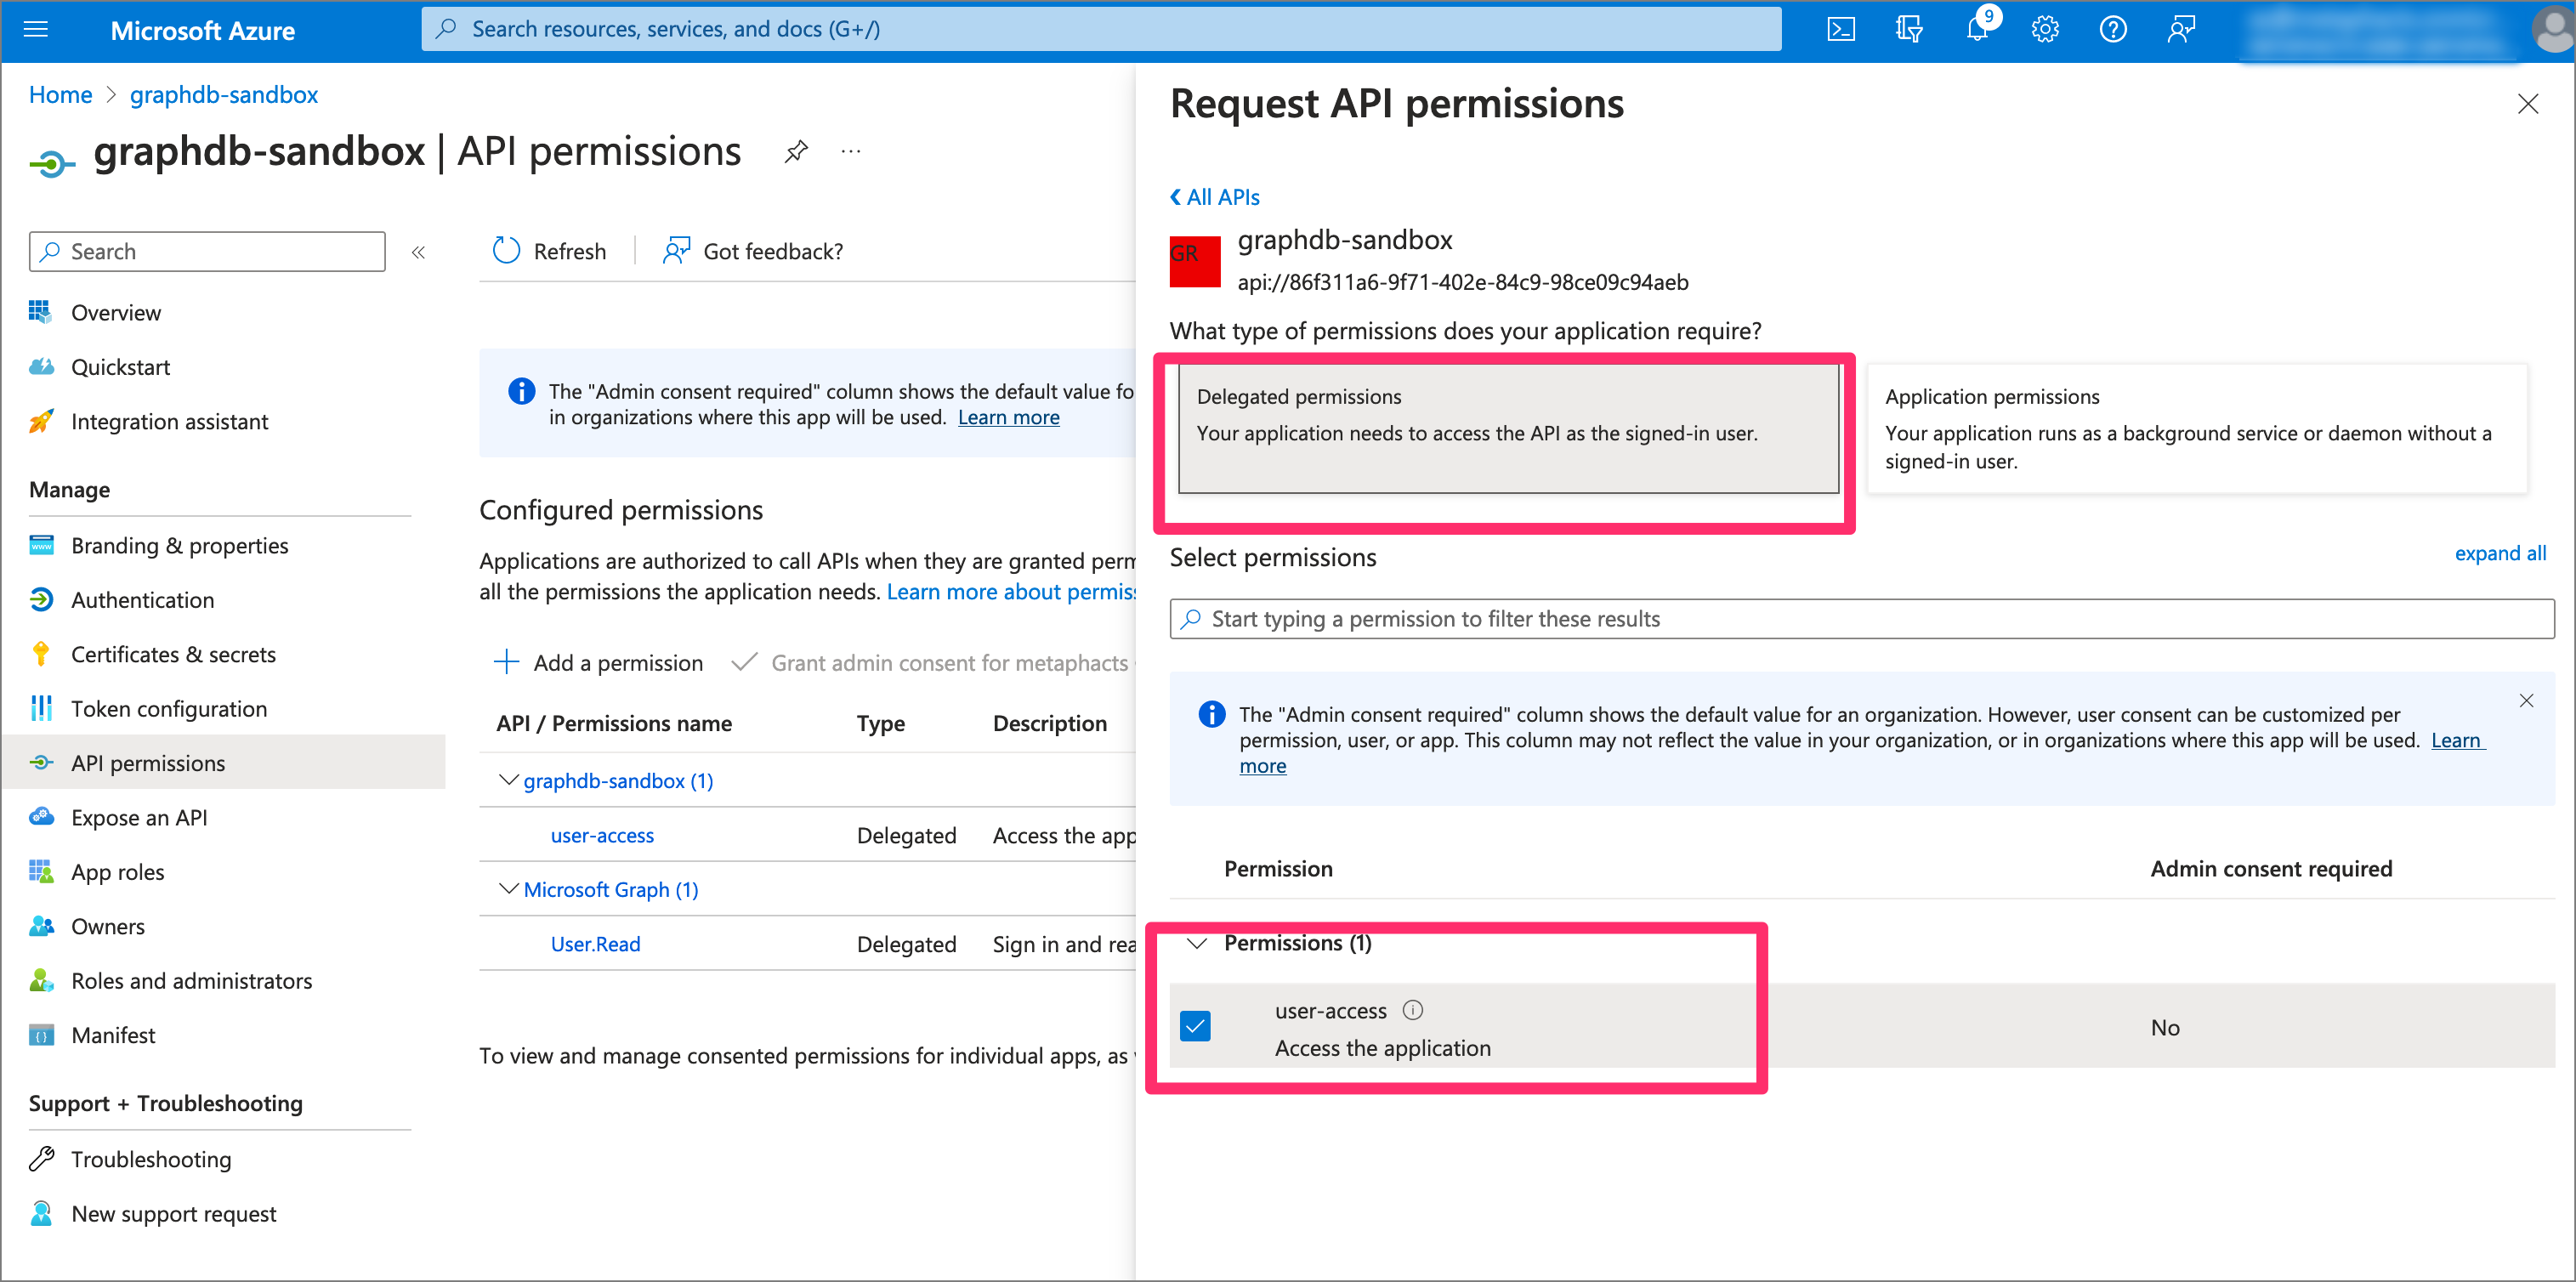
Step 6: Expose an API in the metaphactory application
Next, we are required to expose an API in the metaphactory application. We add a scope with the name user-impersonation and also select Admin and users.
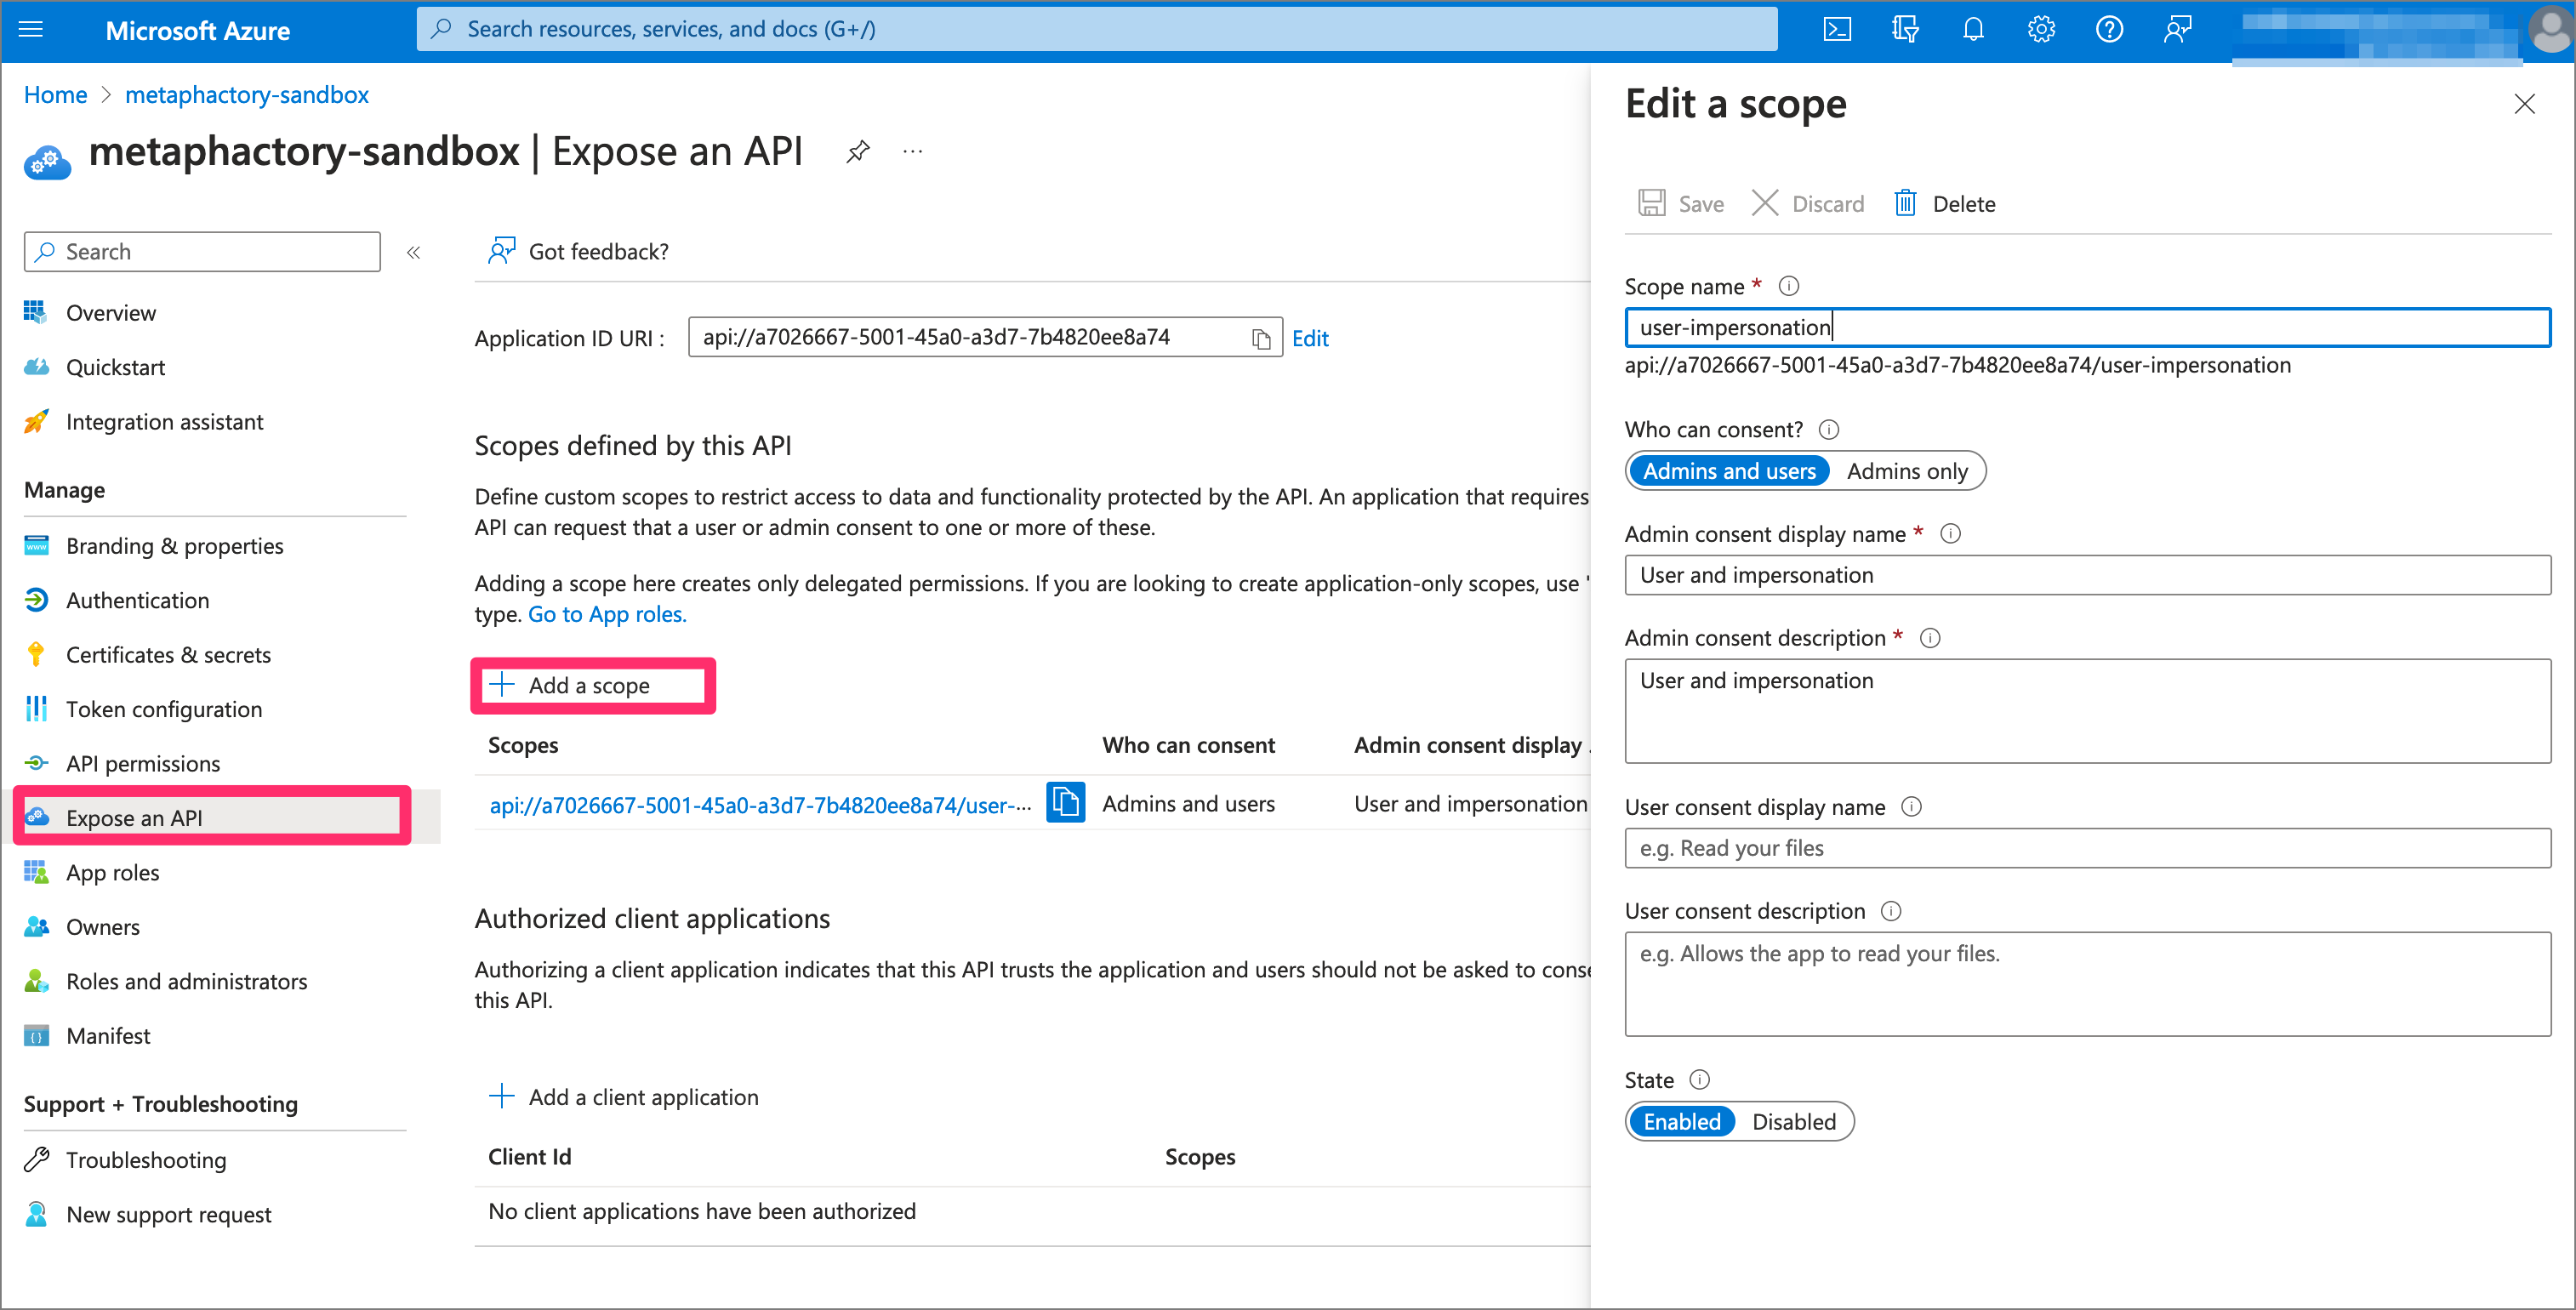
Step 7: Adjust API permissions in the metaphactory app registration
For the created metaphactory API, we also need to define permissions. On one hand, we require permissions for our own scope (i.e., “user-impersonation”), and on the other, we require explicit permission on the “user-access” scope defined in the GraphDB app registration.
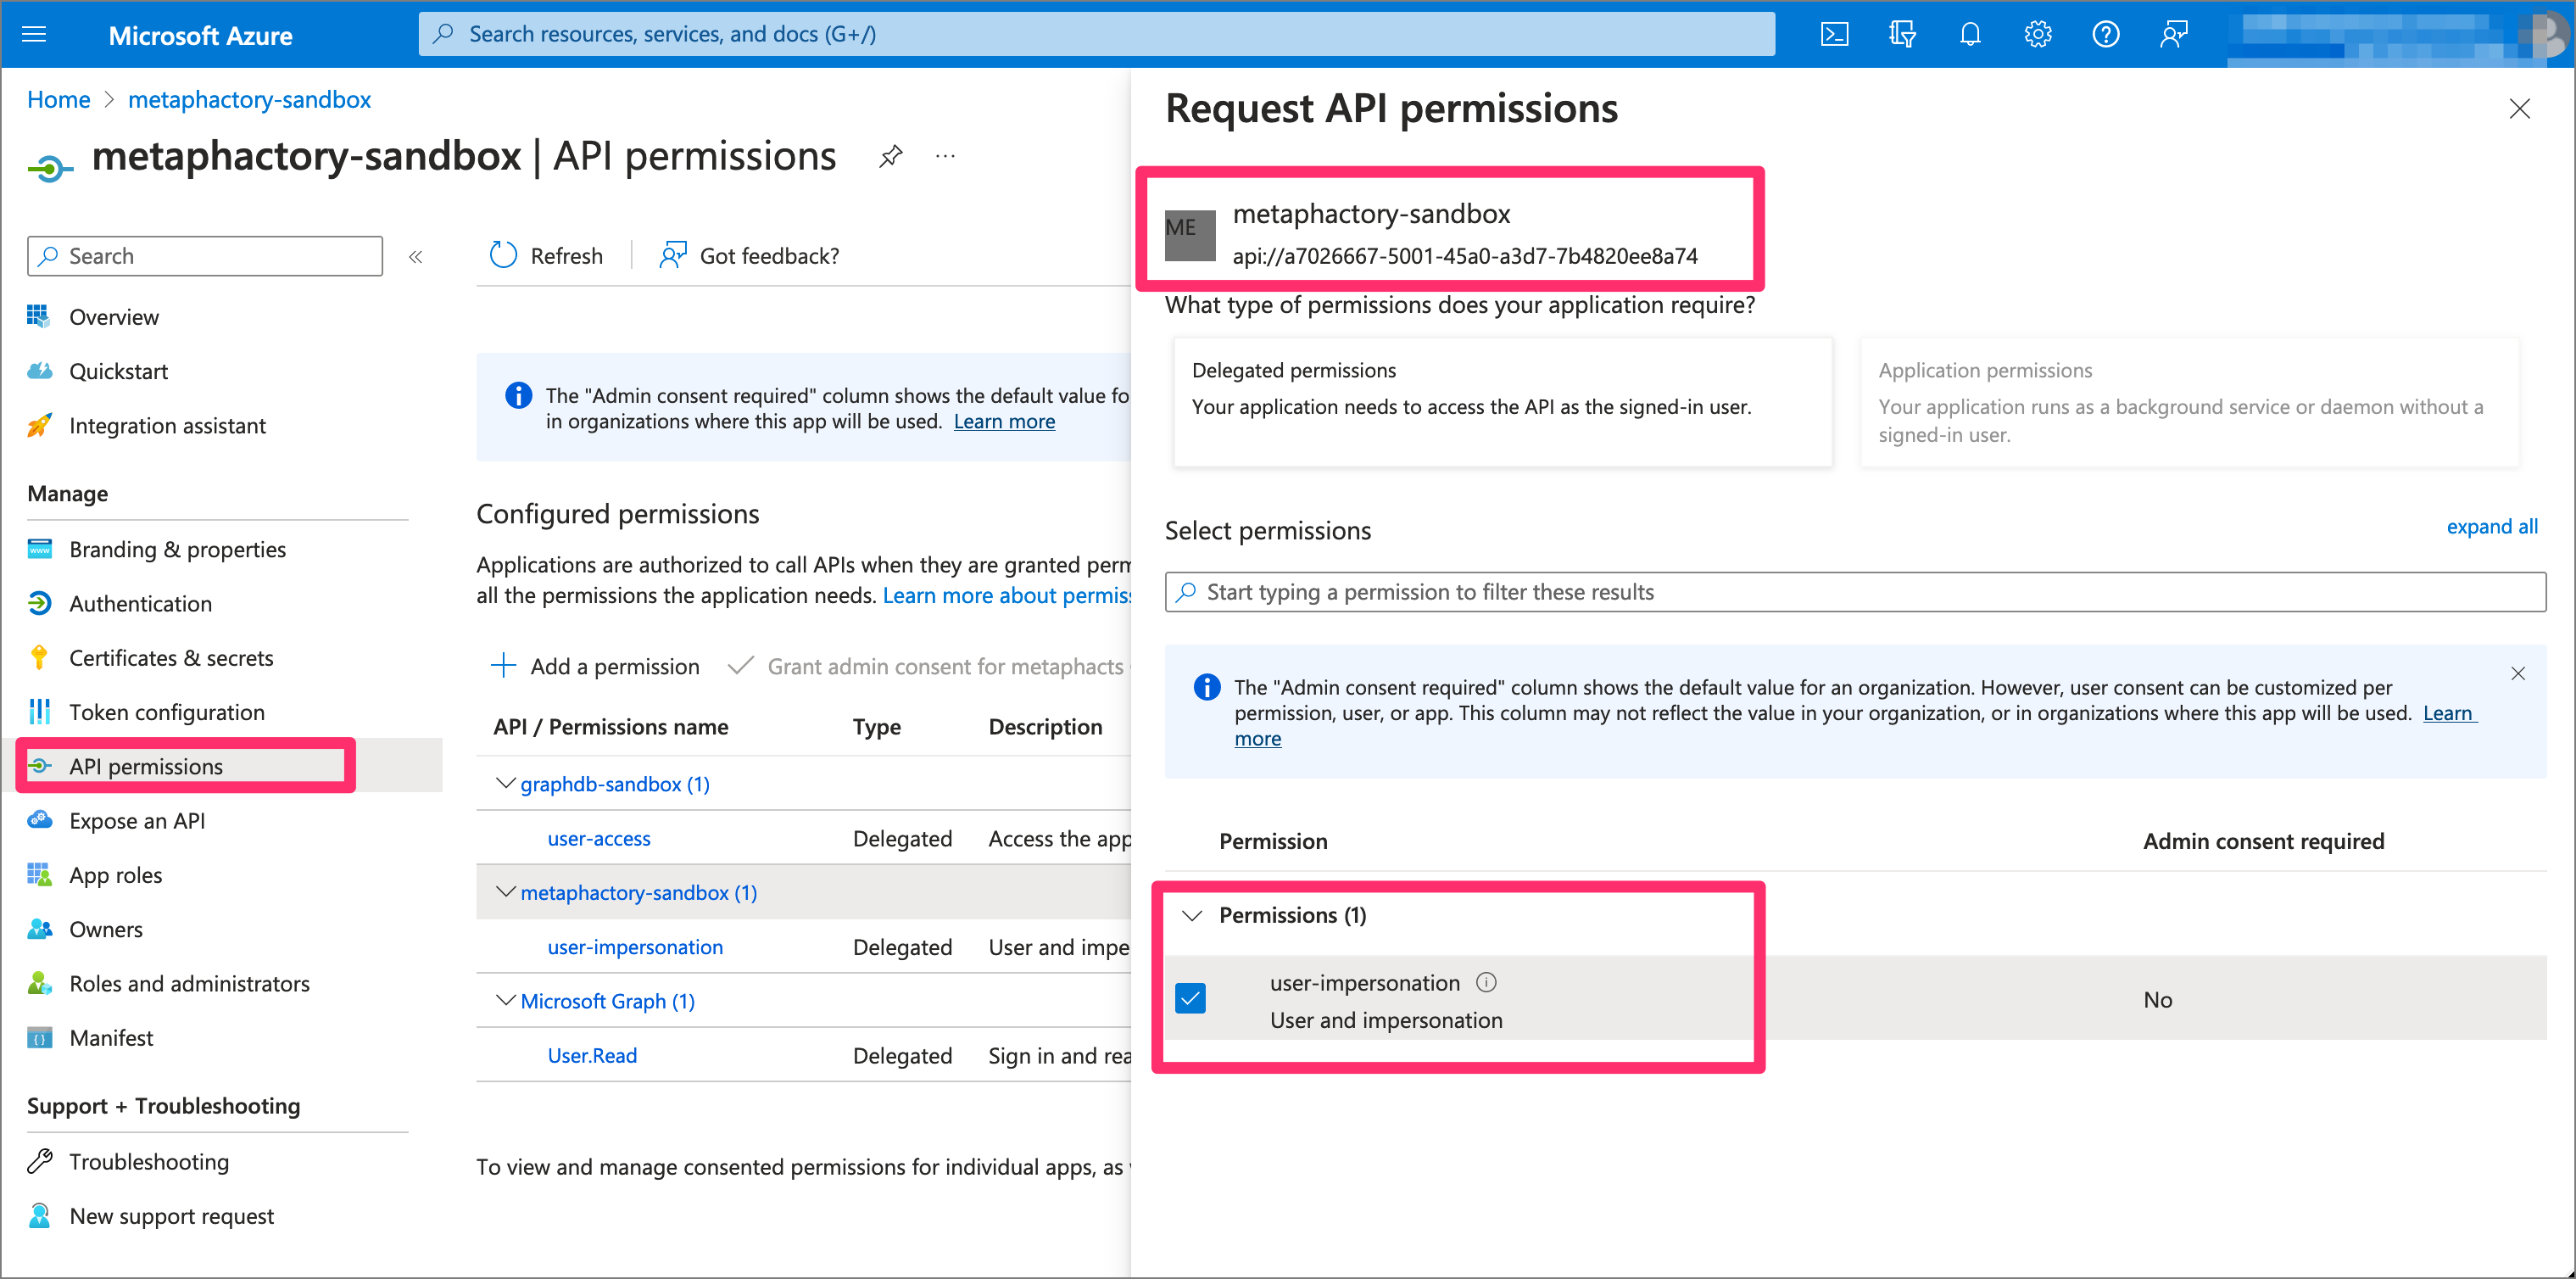
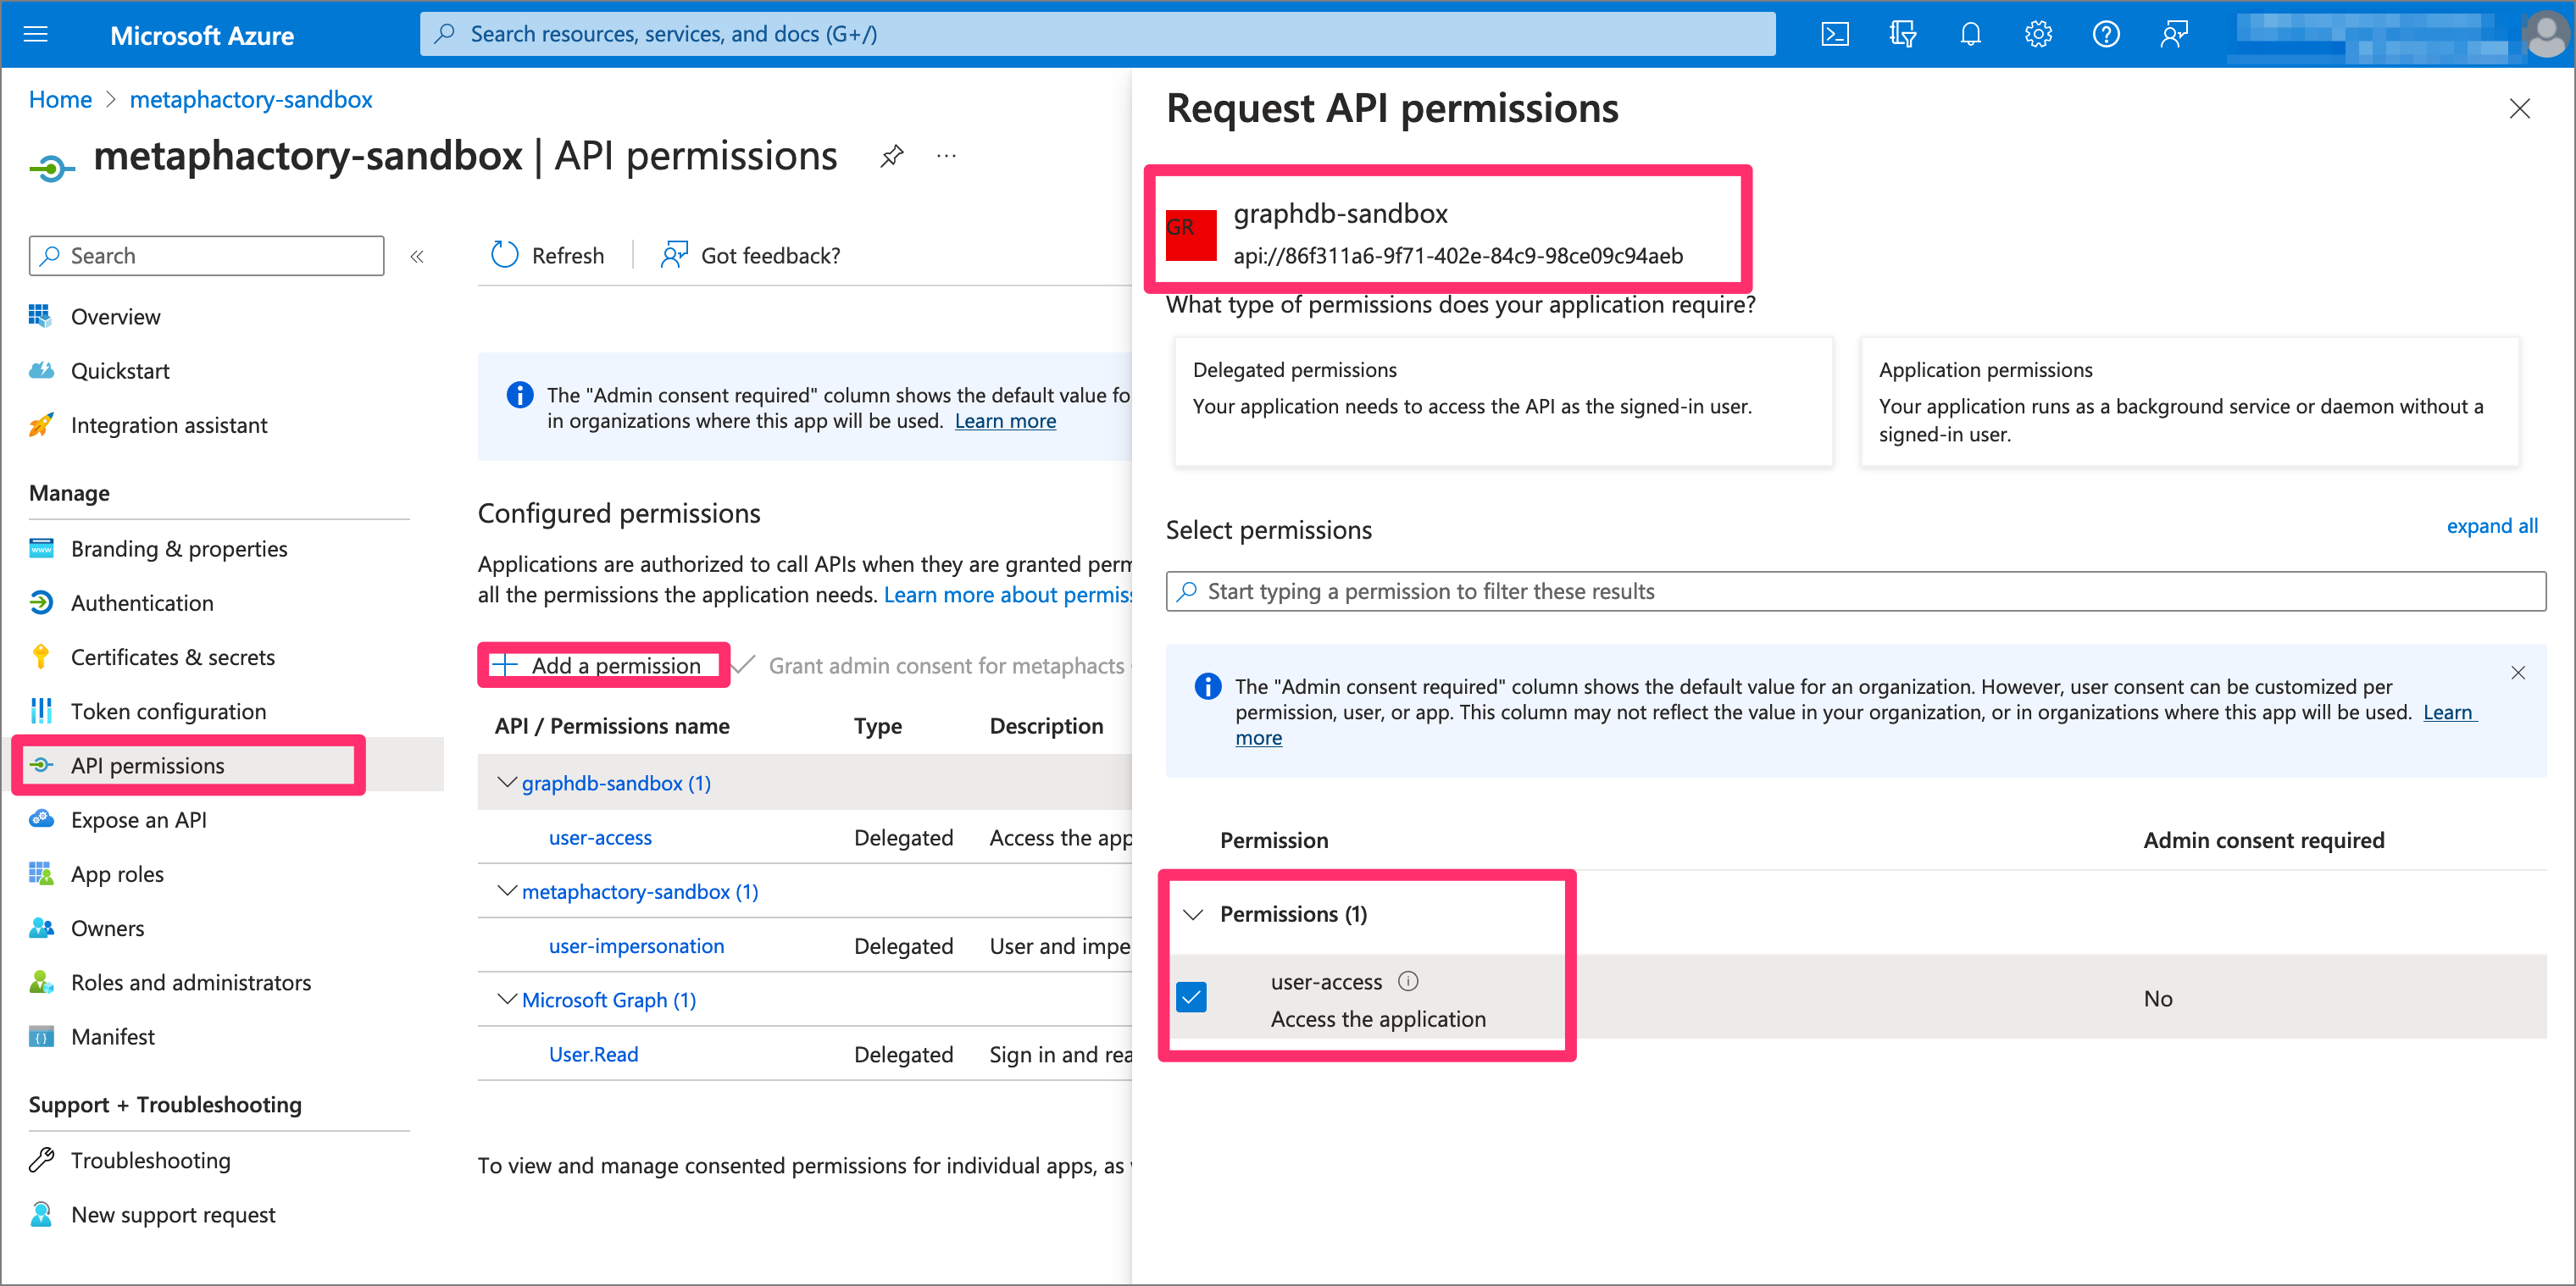
Step 8: Configure applications to explicitly use Azure V2 API
In our environment, Azure did not correctly apply the second version of the API. The consequence is that a wrong issue was supplied in the JWT tokens, causing validations in the OIDC process to fail.
In the manifest of the app registration, the version can be manually set as "accessTokenAcceptedVersion": 2,
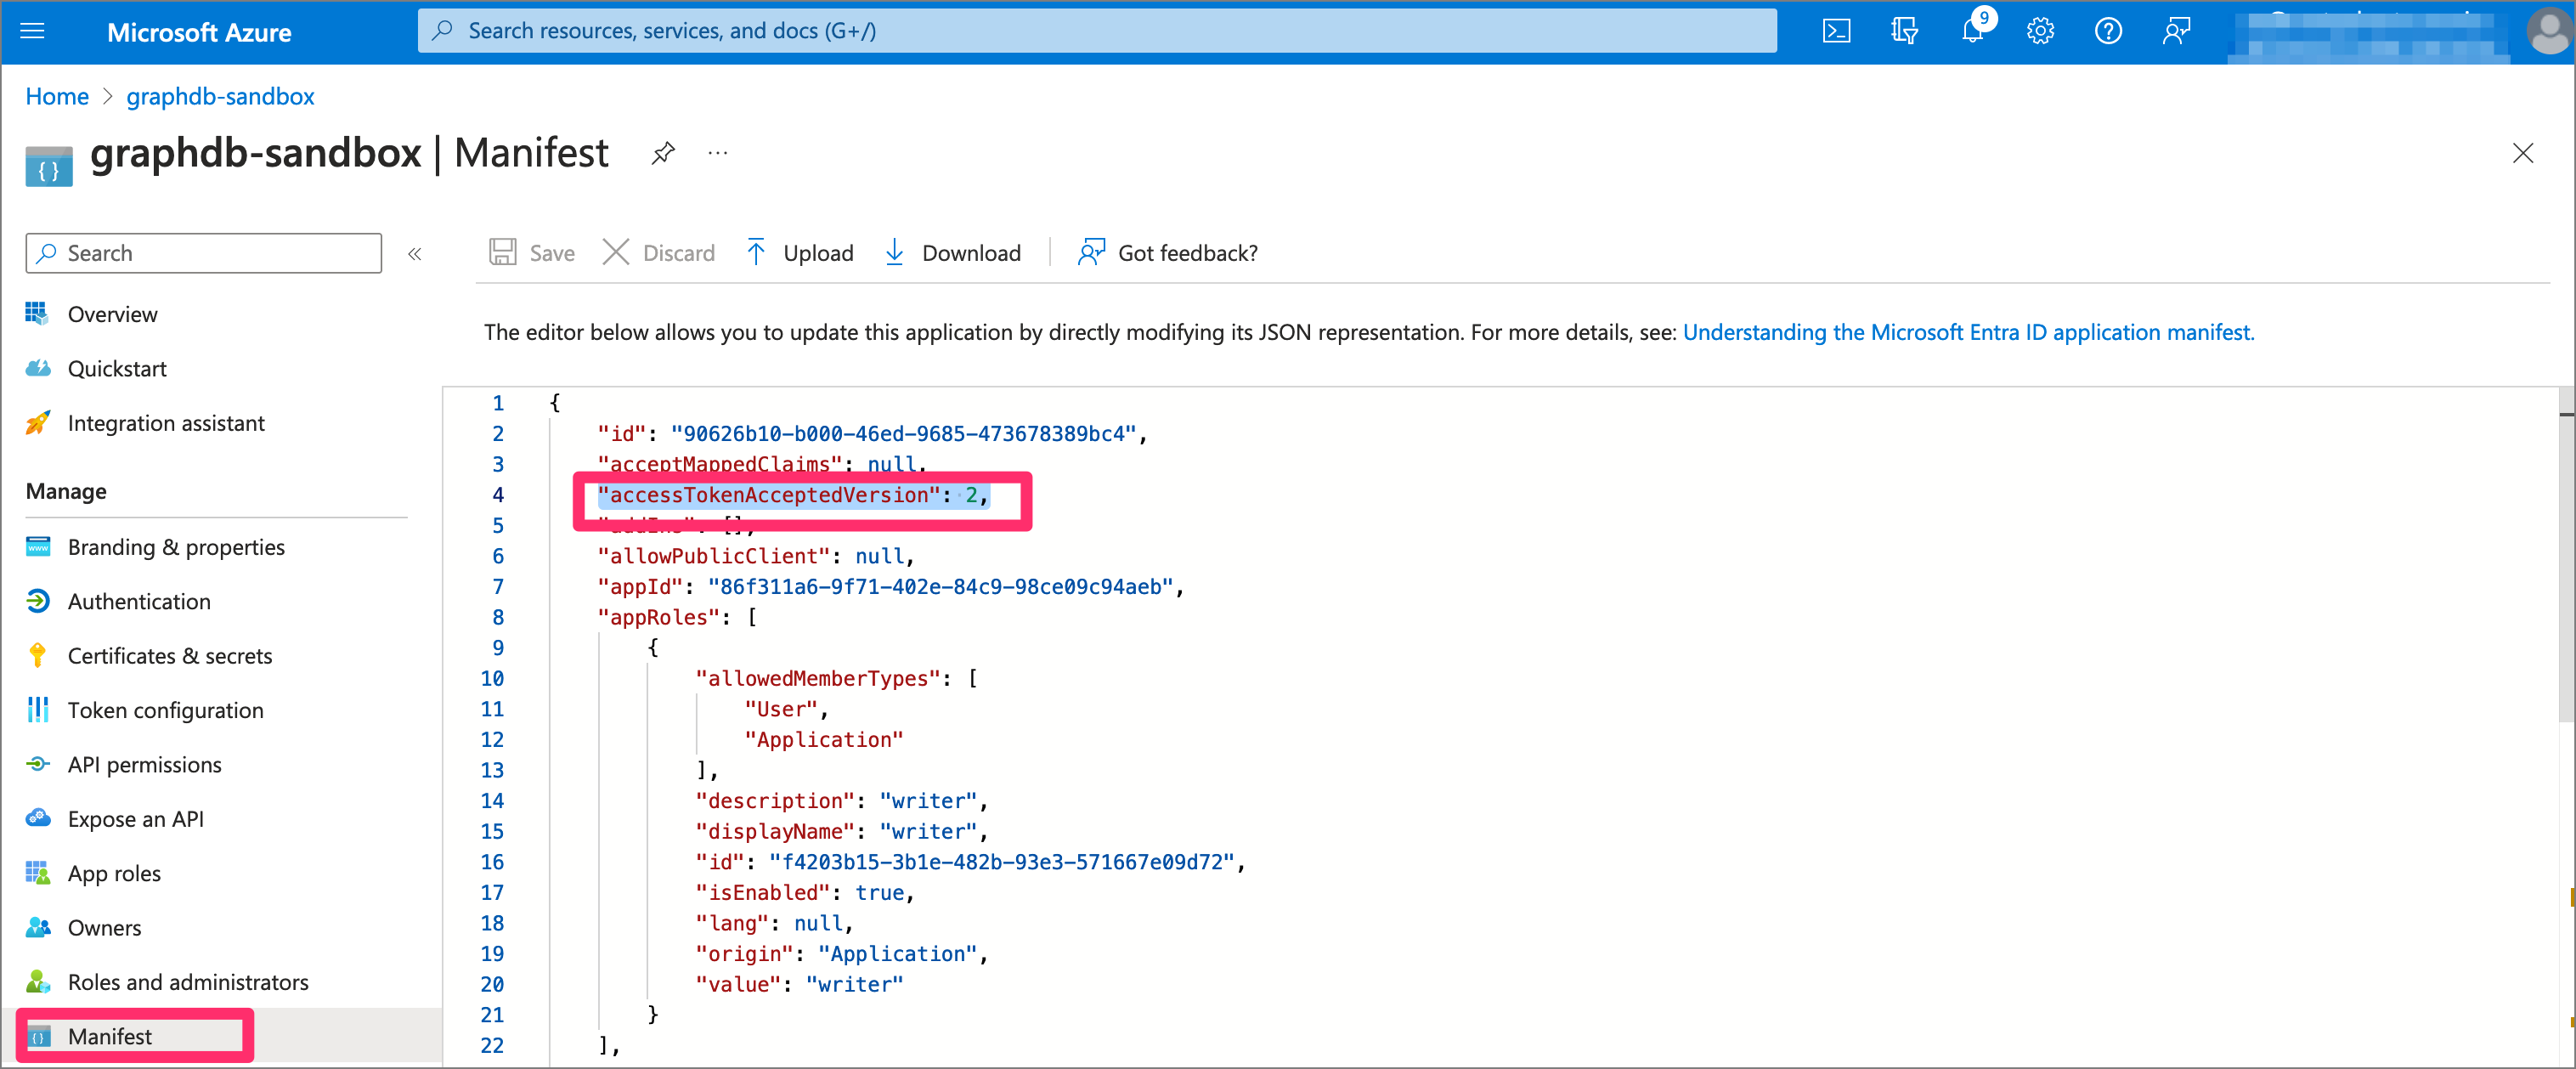
Step 9: Metaphactory SSO configuration
As a next step, metaphactory is configured to use Azure AD as an identity provider for SSO and to apply the on-behalf-of workflow when connecting to GraphDB.
To enable the on-behalf-of workflow in metaphactory, it is required to specify the tokenAttributeName, as well as the sourceTokenName and targetTokenName parameters. The tokenAttributeName defines under which key the user’s token becomes accessible as an externalized secret. The on-behalf-of workflow picks the value up using the key defined in sourceAttributeName (which must correspond to the value of tokenAttributeName) and makes the token for the target system available as an externalized secret with the key defined in targetTokenName. This means that for the GraphDB repository configuration, we can access the valid on-behalf-of token using ${user.external.accessToken} (see example further down below). Note also that for the targetScopes we use the ID of the external API scope from the GraphDB app registration (see step 3).
Below is a complete example configuration to be configured in shiro-sso-oidc-params.ini. Please refer to the OIDC documentation in metaphactory for details on the individual configuration options.
[main]
discoveryURI.value = https://login.microsoftonline.com/TENANT_ID/v2.0/.well-known/openid-configuration
callbackUrl.value = https://sandbox.example.com/sso/callback?client_name=OidcClient
clientId.value = CLIENT_ID
clientSecret.value = CLIENT_SECRET
scope.value = openid email profile offline_access
principalNameAttribute.value = preferred_username
defaultRole.value = admin
rolesClaimAttribute.value = roles
scopeRolesMap.value = "admin":"admin,root"
defaultLogoutUrl.value = /logged-out/index.html

# make the tokens available as externalized secret
tokenAttributeName.value = user.token

# configure the on-behalf-of behavior
sourceTokenName.value = user.token
targetTokenName.value = user.external
targetScopes.value = api://API_SCOPE_ID/user-access
Please note that the “offline_access” scope is required for auto-refresh of tokens, as they expire after a short while.
Additionally, the snippet below contains a repository configuration for GraphDB. Note that the on-behalf-of token is accessed using the externalized secret ${user.external.accessToken}.
@prefix rdfs: <http://www.w3.org/2000/01/rdf-schema#>.
@prefix rep: <http://www.openrdf.org/config/repository#>.
@prefix hr: <http://www.openrdf.org/config/repository/http#>.
@prefix mph: <http://www.metaphacts.com/ontologies/platform/repository#> .

[] a rep:Repository ;
   rep:repositoryImpl [
      rep:repositoryType "metaphactory:GraphDBRepository" ;
      hr:repositoryURL <http://sandbox-graphdb:7200/repositories/metaphactory> ;
      mph:username "${repository.default.username:admin}" ;
      mph:password "${repository.default.password:dummy}" ;
      mph:authenticationToken "${user.external.accessToken}"
   ];
   rep:repositoryID "default" ;
   rdfs:label "GraphDB repository" .
Step 10: GraphDB SSO configuration
The following listing contains a GraphDB SSO configuration for OIDC using the app registration created in Step 2. Please refer to the GraphDB documentation for further details.
Please make sure to enable Security in GraphDB.
###### OPENID AUTHENTICATION + OAUTH AUTHORIZATION ######
# see https://graphdb.ontotext.com/documentation/10.6/access-control.html#openid-oauth

graphdb.auth.methods = openid
graphdb.auth.openid.issuer = https://login.microsoftonline.com/TENANT_ID/v2.0
graphdb.auth.openid.client_id = CLIENT_ID
graphdb.auth.openid.username_claim = preferred_username
graphdb.auth.openid.well_known_config_url = https://login.microsoftonline.com/TENANT_ID/v2.0/.well-known/openid-configuration
graphdb.auth.openid.auth_flow = code
graphdb.auth.openid.token_type = id
graphdb.auth.openid.extra_scopes = email profile

###### OAUTH AUTHORIZATION
graphdb.auth.database = oauth
# OAuth roles claim. The field from the JWT token that will provide the GraphDB roles.
#graphdb.auth.oauth.roles_claim = roles
# Note: we use the "name" attribute as this is always present, while roles is only present when explicitly mapped in azure ad
graphdb.auth.oauth.roles_claim = name
# OAuth default roles to assign. It may be convenient to always assign certain roles without listing them in the roles claim.
graphdb.auth.oauth.default_roles = ROLE_USER, READ_REPO_*, WRITE_REPO_*
Step 11: Testing
Once the above steps are completed, the database interaction from metaphactory to GraphDB is initiated with the current user’s identity. This is achieved using the on-behalf-of workflow, which allows you to obtain a token for the user in metaphactory to be used for database communication.
Step 12: Troubleshooting
For troubleshooting, the logger com.metaphacts.security.sso.oidc.AzureOnBehalfOfPerUserTokenHandler can be set to TRACE. This will show the details of the on-behalf-of workflow.

2023-11-01 21:14:28,752 TRACE [qtp1832580921-350] com.metaphacts.security.sso.oidc.AzureOnBehalfOfPerUserTokenHandler - Successfully exchanged token 'user.token' for userThis email address is being protected from spambots. You need JavaScript enabled to view it. and stored it as 'user.external' 2023-11-01 21:14:28,754 TRACE [qtp1832580921-350] com.metaphacts.security.sso.oidc.AzureOnBehalfOfPerUserTokenHandler - Received access token: REDACTED 2023-11-01 21:14:28,755 TRACE [qtp1832580921-350] com.metaphacts.security.sso.oidc.AzureOnBehalfOfPerUserTokenHandler - Received refresh token 2023-11-01 21:14:28,755 TRACE [qtp1832580921-350] com.metaphacts.security.sso.oidc.AzureOnBehalfOfPerUserTokenHandler - Token expires at 2023-11-01 22:13:00
The JWT token is displayed in the logs, and can be further inspected (e.g. on https://jwt.io/ )
- Note that the “aud” value points to the GraphDB application
- The “iss” value should use the v2 protocol
- If a role mapping is applied in the GraphDB app registration for the given user, the jwt contains a “roles” attribute
{
"aud": "API_SCOPE_ID",
"iss": "https://login.microsoftonline.com/TENANT_ID/v2.0",
...
"name": "Demo User",
"oid": "REDACTED",
"preferred_username": "This email address is being protected from spambots. You need JavaScript enabled to view it. ",
...
"scp": "user-access",
...
"ver": "2.0"
}
Additional troubleshooting can be done by inspectingHTTP client header logs by setting org.apache.http.headers to TRACE. The logs will show the token being sent as “Authorization: Bearer" header being sent as part of each request. Also, the GraphDB logs may be inspected for details. Note that debug logs can be activated by passing -Dgraphdb.logger.root.level=DEBUG to the start command.
Summary
Now that you know how to configure Single Sign-On in metaphactory, you can make use of this new feature by upgrading to metaphactory 5.2! If you don’t already have metaphactory, you can try it for yourself with our free 2-week trial.
metaphactory is an industry-leading enterprise knowledge graph platform transforming data into consumable, contextual and actionable knowledge. Our low-code, FAIR Data platform simplifies capturing and organizing domain expertise in explicit semantic models, extracting insights from your data and sharing knowledge across the enterprise.
metaphactory includes innovative features and tools for:
- Semantic knowledge modeling — explicitly capture knowledge & domain expertise in a semantic model & manage knowledge graph assets such as ontologies, vocabularies and data catalogs
- Low-code application building — build easy-to-configure applications that fit your enterprise and use-case requirements using a low-code, model-driven approach
- End-user-oriented interaction — users of any level of technical experience can interact with your data through a user-friendly interface that includes semantic search, visualization, discovery & exploration and authoring
Power knowledge democratization and decision intelligence within your enterprise with metaphactory. Trusted by global enterprises like Boehringer Ingelheim, Siemens Energy and Bosch.

